If you are someone who wants to create a sleeping schedule more smartly and wants to keep track of your health, then you have come to the right place. I know it becomes very tough to maintain a sleeping schedule, especially when you remain busy all day in your office or business work. However, the Apple Watch is a gadget that removes this worry and easily keeps track of the sleeping schedule. Keep reading further about how to use Sleep Tracking on Apple.
Apple Watch is such a wonderful gadget that not only gives you the time updates, but it does many other things which no other smartwatch can do. Many outstanding features are inbuilt into the Apple Watch; unfortunately, not many users are aware of them. I will be guiding you step by step to make you understand how to use Sleep Tracking on Apple Watch.
Therefore, walk with me through the article to understand thoroughly how to use Sleep Tracking on Apple Watch and create your own personalized sleep timetable.
In This Article
How to Use Sleep Tracking on Apple | Few Simple Methods to Follow
It is very important these days to plan everything be it your meetings, giving time to family, meeting friends and relatives, or sleeping schedule (how to use Sleep Tracking on Apple). To maintain the balance in life in every aspect, planning or scheduling is very important. In this regard, when using Apple gadgets, it gives you an edge and the capability to keep track of your every activity including your sleeping. To learn how to use Sleep Tracking on Apple, please follow the instructions given below.
1. Set Up Sleeping Goals
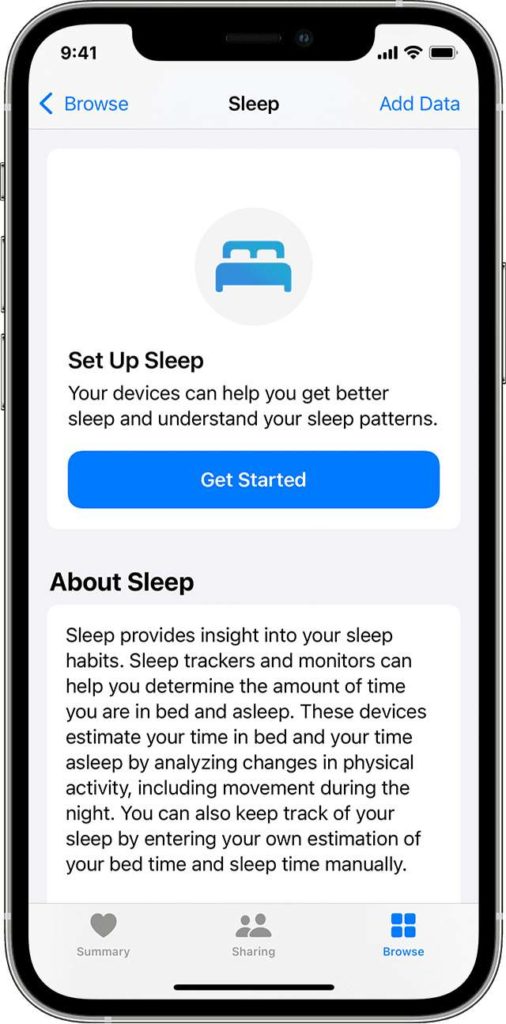
As far as how to use Sleep Tracking on Apple is concerned, you need a good night’s sleep for good health. You may establish a sleeping target and monitor your progress toward it over time with the help of the Health app for iPhone.
1. Get your iPhone’s Health application open.
2. Underneath Set Up Sleep, select Get Started, then select Next.
3. Read the instructions on the screen to create:
Sleep Goals: Decide how many hours you’d want to sleep.
Bedtime and Wake Up times: Decide when you want to get up and go to sleep.
Sleep Screen: iPhone may make your Home screen simpler and activate Sleep Focus when it’s time for sleep to minimize interruptions. You could also authorize specific individuals or applications to alert you. Click Focus > Sleep in the Configuration app on your iPhone. Choose the person or thing that could inform you while Sleep Focus is on by tapping Users or Apps under Allowed Notifications.
Track Sleep with Apple Watch: To monitor your sleep, take your watch to bed. Whether you’ve previously synced your Apple Watch and iPhone, this option is available during setup. Track Sleep with Apple Watch could still be enabled afterward if you connect your Apple Watch following setup.
Wind Down Short Cuts: Create alternatives that will keep you calm at night, including putting on a relaxing setting in your house, playing calming music, or using your preferred meditation app.
Adapt Your Sleep Schedule
On your iPhone or Apple Watch, you may change your sleeping objective as necessary (how to use Sleep Tracking on Apple).
Adapt Your Sleep Schedule On Your iPhone
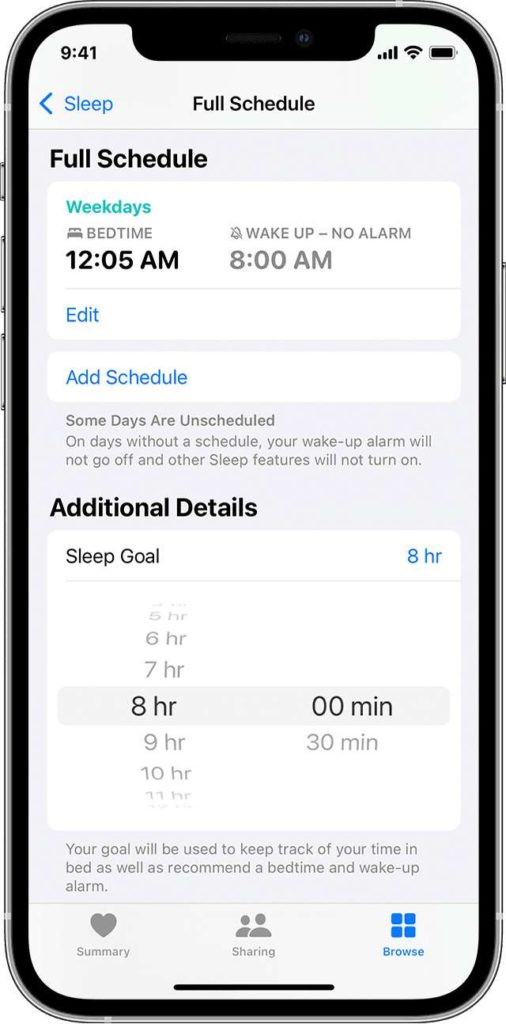
1. Launch the Health app, select Browse from the bottom menu, and then select Sleep. From the Summary section in the Health app, you may get Sleep if you have added it to your Favorites list.
2. Secondly, select Full Schedule & Options.
3. Select Sleep Goal from the list of further details.
4. Make any necessary modifications to your sleep goal, then press the time you’ve chosen to save them.
Adapt Your Sleep Schedule On Your Apple Watch
1. Click Full Schedule on the Sleep application.
2. Click Sleep Goal in the Options section.
3. To change your goal, tap the Plus and Minus icons.
4. To go back and save your modifications, tap Sleep Goal in the upper left corner.
How to Modify Sleeping Schedule On Your iPhone
You can alter your whole calendar or just Next Wake Up Only if you need to alter your sleep pattern. Changes you make are only effective the day after you select Next Wake Up Only. Any alterations to your whole itinerary take effect for all upcoming days.
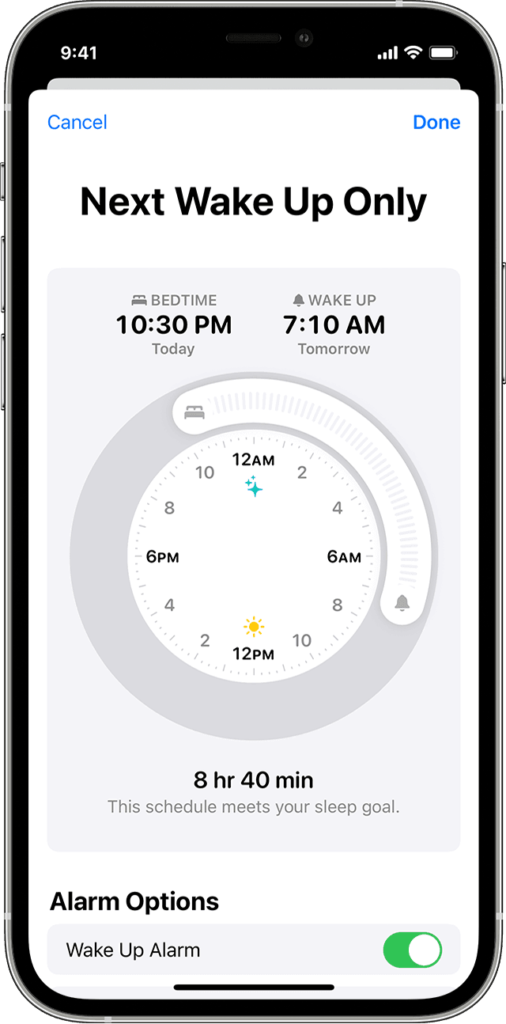
Update Next Wake Up Only
1. Launch the Health app, select Browse from the bottom menu, and then select Sleep. From the Summary section in the Health app, you may select Sleep whether you have added it to your Favorites list.
2. Click Edit next to the sleeping pattern.
3. To select your bedtime and wake-up time, drag the curving adjuster. If the timetable falls short of your desired amount of sleep, the slider turns orange.
4. Click Wake Up Alarm to activate the clock and choose the tactile buttons, audio, and volume.
5. Click Done to save your adjustments.
Update Your Entire Calendar
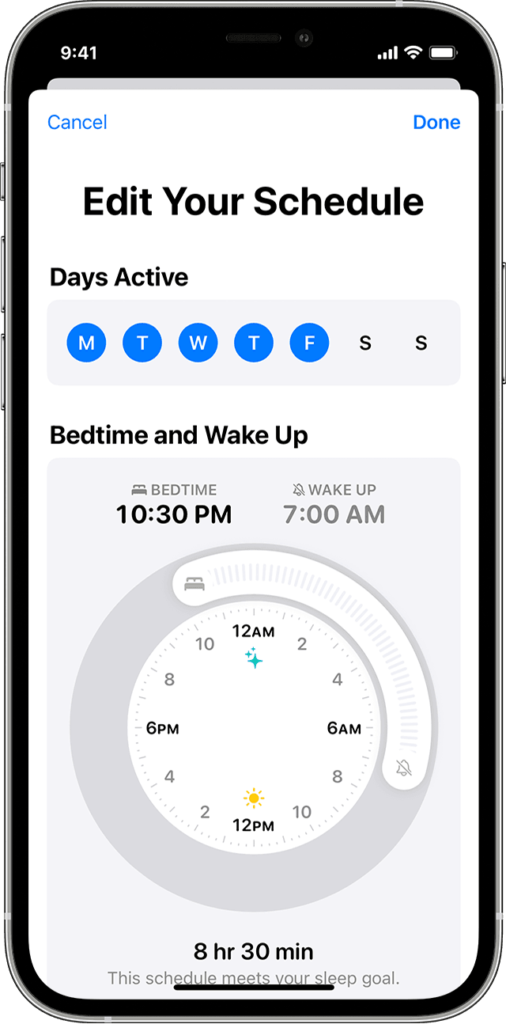
1. Click Sleep in the Health app.
2. In Full Schedule & Options, select a Schedule.
3. Click Edit next to the schedule you want to change.
4. To select your bedtime and wake-up time, click the Days Active and move the curving slider. If the timetable falls short of your desired amount of sleep, the slider turns orange.
6. Hit Wake Up Alarm to activate a clock and customize its haptics, sound, and volume.
7. To save your changes, hit Done.
Additionally, users may disable this sleep schedule as necessary (how to use Sleep Tracking on Apple). Select Browse > Sleep > Full Schedule & Options from the Health app. Toggle your routine on or off by tapping Sleep Schedule at the top of the display.
How to Modify Sleeping Schedule on Your Apple Watch
Users may alter their whole calendar or just Next Wake Up Only if they require to modify their sleep pattern. Modifications you make are only effective the day after you select Next Wake Up Only. Any alterations to your whole itinerary take effect for all upcoming days.
You may leave Sleep Focus when you wake up earlier than your scheduled Wake-Up time. Your Apple Watch can be unlocked by turning the Digital Crown. Next, tap the Sleep app icon in Control Center after sliding up to reveal it.
Update Next Wake Up Only
1. Activate the Sleep application.
2. Toggle to the calendar under Next.
3. Click Bedtime or Wake Up.
4. To change the time, touch the hour or minute and flip the Digital Crown.
5. Finally, click the checkbox to save.
6. To activate an alarm and change its sound and haptics, click Alarm.
7. To save your changes for the next day, select Edit Schedule in the upper left.
Update Your Entire Calendar
1. Click Full Schedule on the Sleep app.
2. Select the schedule that needs editing.
3. Click the days you wish to configure the sleep routine for, then hit the days under Active On.
4. Press Done to save your adjustments.
5. Click Bedtime or Wake Up.
6. To change the clock, press the hour or minute and move the Digital Crown.
7. To save, press the checkbox.
8. Click Alarm to set an alarm and customize its sound and haptics.
9. To save your modifications for the entire schedule, hit Edit Schedule in the upper left.
After following all these steps above, you shall be able to understand how to use Sleep Tracking on Apple and how to edit schedules as well.
Wrapping Up
I hope you have learned now how to use Sleep Tracking on Apple while scrolling through the write-up thoroughly. I have compiled a list of instructions in detail in this article that shall guide you easily while looking to know how to use Sleep Tracking on Apple.
I am sure once you learn the process thoroughly, you will be able to set the sleeping schedule accordingly (how to use Sleep Tracking on Apple) and would not create any lag in your work or personal life. I recommend going through the article carefully from beginning to end to understand every in-built feature of Apple gadgets.
If there is any other question related to how to use Sleep Tracking on Apple, please write back to me in the comments section below.