
Did you know you can watch how the cities used to look in history on Google Earth? Here I will tell you how to go back in time on Google Earth. Google Earth kind of transcends Google Maps by taking the visual experience of the places on earth to the next level. We can now watch the planet from far above, zoom in, and have a 3D view of the buildings. In addition, you can enjoy the historic imagery of the places. We will talk about it n a while.
The feature is fascinating. Just imagine the historic imagery of your city. You can see the streets changing with time and how places have evolved over several decades. This tool is great for academic research or just for fun. The best part is that it is available worldwide and is absolutely free.
I find a lot of people asking the same question; how to go back in time on Google Earth? Well, it’s only a matter of a few steps. I will mention the steps to go back in time on Google Earth, but before that let me tell you that it is only available on Google Earth Pro So, let’s get going.
In This Article
How to Go Back in Time on Google Earth?
Google earth’s Historical Imagery feature is only accessible from your computer. You will need the downloadable software version of Google Earth.
1. Navigate to the Google Earth Pro Download page.
2. Download and install Google Earth on your computer.
3. You will see a search bar at the top left sidebar; click on it and search for the location you want to view changes. You can search anything from a city, a state, a nation, GPS coordinates, addresses, and ZIP/postal codes.
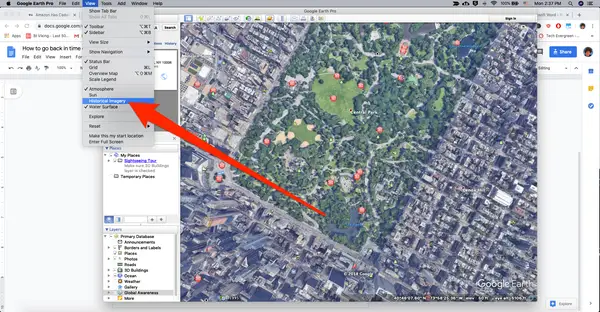
4. Click on View at the menu bar located at the top.
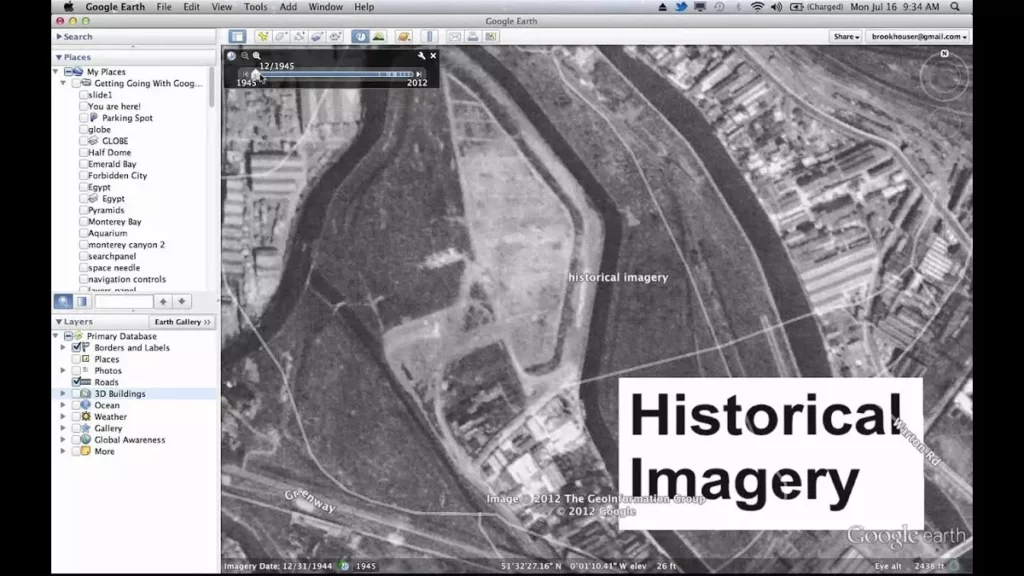
5. Click Historic Imagery.
6. At the top of your 3D viewer, you will notice a bar that will let you scroll and change the time. The map will take you back in time as you scroll back.

Lastly, I would also like to add that you can go as far back as 1930 using the Historical Imagery feature on Google Earth. You can go back and see how a place used to look. You can spend hours navigating through the older versions of the places on earth.
How to Go Back in Time on Google Maps on The Web?
You can see how a place has changed in the course of time because of Google’s recorded data. Google has been recording our streets for over a decade now. This is how you access history on Google Earth’s website:
1. Not all roads on Google Earth have street views. Drop Pegman (the yellow street view guy) on a road that has street view.
2. The street name is displayed on the upper-left corner of the screen. Click on it.
3. You will notice a slide bar under a small preview of the same street. You have to select a year by sliding the slide bar to view the same street from a time in the past.
4. Click on the zoom button on the preview image to load the image on the main screen and get a better view.
How to Go Back in Time on Google Maps Via Android?
The street view timeline on the Google Maps Android app is where you can go back in time. The timeline lets you access street-view imagery of places that have been recorded by Google over the years. To access it,
1. Go to Google Maps and tap on Layers to enable Street View. If it is already enabled, go to the next step.
2. Go back and zoom into a place you want to see the historical imagery of. Tap on a road that has a street view available.
3. There will be a split screen; the street view on the top and the map view of the same on the bottom.
4. The street view images along with the dates they were taken will be at the bottom of the street view screen. Tap on See more dates from the right.
5. A timeline of images with dates will appear. You can scroll to the extreme right to access the oldest image.
6. Tap on any year’s image from the timeline to see the street view of the place from that time.
How to Use Timelapse on Google Earth?
The timelapse feature on Google Earth offers timelapse imagery of the history of certain locations using high-quality satellite-captured images. You don’t even need to download the application to use Timelapse on Google Earth.
1. Go to the Google Earth website.
2. Go to Voyager by clicking on the Helm icon on the sidebar at the left.
3. Click on Nature at the bottom.
4. Scroll down to find Timelapse in Google Earth. Select it.
5. On the right-hand side you can pause the timelapse animation. You can also scroll between times manually using the selector.
6. Below the bar, you can see 5 themes. Every theme has about six or more places you can visit. Select one of the themes.
7. Now scroll through stories one by one using the arrow on the right-hand side.
How to Use Google Earth Timelapse on Mobile App?
Google Earth’s timelapse feature is also available on the Android app. You can enter Voyager mode by tapping on the helm icon right on the homepage of the Google Earth app. The rest is pretty much the same as using Google Earth’s timelapse on the web.
The Google Earth mobile app doesn’t include a historic imagery tool. So, if you want to dive into the past on your mobile, you have to make use of the timelapse feature. The curated trips are filled with high-quality images.
How to go Back in Time on Google Earth?
Wrapping Up
The Historic Imagery view of Google Earth is pretty impressive and there aren’t any alternatives to this feature in the world. Congratulations, now you know how to go back in time on Google Earth.
Go and enjoy this feature as well as use it as an academic tool for your students (if you are a teacher). Children love this feature. So do I. Even without this splendid aspect, Google Earth is amazing. The experience of seeing life-like images is breathtaking. It is fun as well as enlightening!