Have you upgraded your iPhone from iOS 15 to iOS 16? You might think upgrading to the iOS 16 version is your big mistake as you cannot find the voice message option. Let me tell you one thing, upgrading the old iOS versions to new iOS versions always comes with new advancements. So, I do not think that upgrading to iOS 16 has disabled the voice message option. But, it has been relocated from its traditional place and updated with a few changes for using it. In case you need to know: How to Send Voice Messages on iPhone iOS 16 then you are at the right place.
First, I would like to tell you that iPhone iOS 16 does not disable the voice message option. The voice message option is now relocated. If your finger is removed from the microphone icon now, the message will not send in broken multiple pieces. You do not need to hold the microphone icon in the upgraded new iPhone iOS 16 version. I have researched and figured out a step-wise guide for your easy understanding.
In today’s post, I will guide you through the steps to send messages on iPhone iOS 16. I will also make you aware of the new location of the voice message icon.
In This Article
How to Send Voice Messages on iPhone iOS 16?
After relocation and changing the voice typing icon, many of you must think that sending audio messages is a little fizz with iPhone iOS 16. But it’s not like that now. Sending voice messages on iOS 16 is now relatively straightforward. You can send voice messages on iPhone iOS 16 in two easy methods.
Method 1: Send Voice Messages Using The Built-in Voice Memos App
Below are the easy and quick steps that will guide you in sending voice messages using the “Built-in” Voice Memos app are as follows:
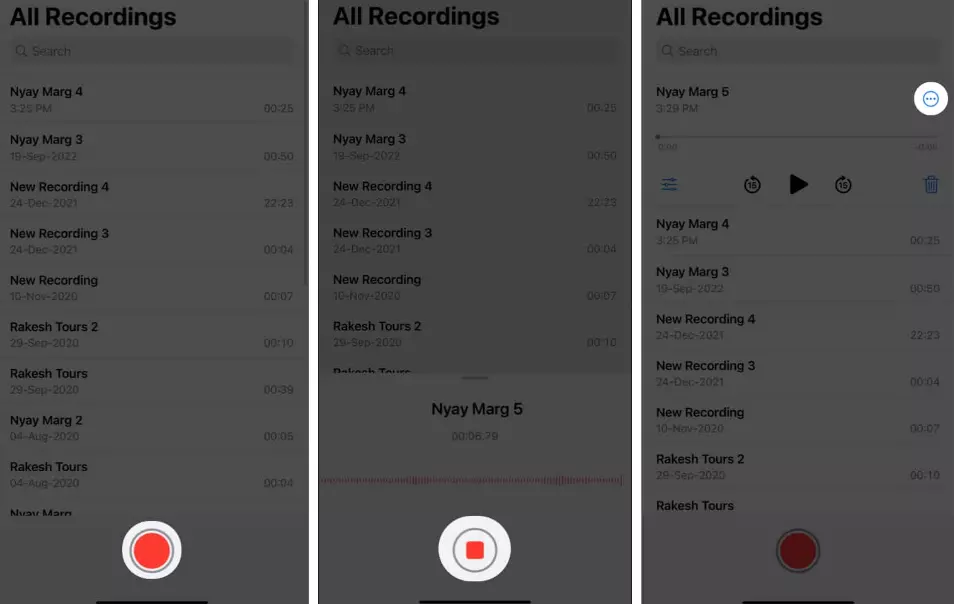
- Open The Voice Memo App
You can find the Voice Memos app on your home screen or in the app library. Tap on the icon to open the app.
- Record Your Voice Messages
To record a new voice message, tap the red record button in the center of the screen. Then, hold the phone close to your mouth and speak clearly into the microphone. To stop recording, tap the stop button.
- Review & Edit Your Editings (Optional)
After recording, you can review and edit your message if necessary. Tap the play button to listen to your recording, and use the editing tools to trim or delete parts of the recording.
- Save Your Recording
Once you are happy with your recording, tap the “Done” button. Then, you can send the recording via iMessage, Email, AirDrop, or any other app that supports audio files.
Method 2: How to Send Voice Messages on iPhone iOS 16 Through Messages App?
You can also send voice messages directly from the Messages app on your iOS iPhone 16. The steps are as follows:
- Open The Messages App
You can find the Messages app on your home screen or in the app library. Tap on the icon to open the app.
- Start A New Message
To send a message to a specific contact, tap the compose button in the top right corner of the screen. Now, choose the recipient you want to send an audio message.
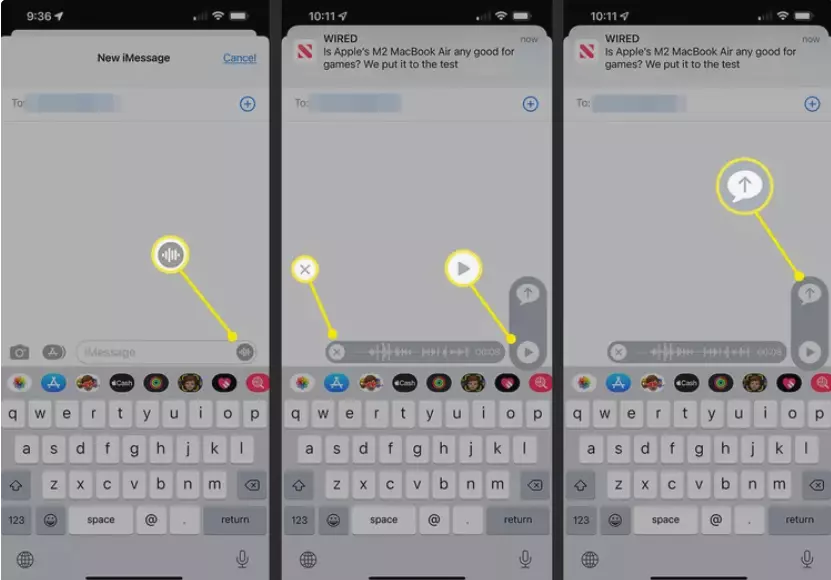
- Record Your Voice Message
Tap and hold the microphone icon next to the message field, and start speaking. Release the icon when your recording is done.
- Send Your Voice Message
Tap on the arrow option to send your messages. The recipient will receive the audio message in their Messages app.
Where Is The Voice Message Icon Present Now?
The message option is present to the right of the message field. The symbol is “Microphone” instead of “Message button.” The voice message button is now moved into the drawer of the iMessage app and becomes its voice typing function. You do not need to activate the voice message function in the iMessage app by drawing other apps from the Apple store. If you upgraded to iOS 16, you could access the Audio Messages app directly.
How To Record Your Voice Message?
Before sending your voice messages on iPhone iOS 16, you must record your voice messages. Then, using an iOS iPhone 16, you can record your voice message. The process is quite simple and easy.
- Open the “Messages” app on your iPhone. Tap on the conversation where you want to send the voice message.
- Tap and hold the microphone icon present to the right of the text box. This will bring up a recording screen.
- Hold the microphone icon, and start speaking into the iOS 16 microphones to record your voice messages. You will see a waveform animation indicating your iPhone iOS 16 is recording your voice message.
- When you are done speaking, release the microphone icon.
- The message is now automatically sent to the recipient.
- If you want to listen to your voice message before sending it, tap on the “Play” button to the left of the microphone icon.
- If you make a recording mistake, you can slide your finger to the left while holding the microphone icon to cancel the message.
Tips for Recording a Clear Voice Message
Have you tried several times to record your voice message? But sadly, you cannot record the audio message with a clear voice. So, I have researched thoroughly and found a few tips that will help you record a clear voice message. Following these tips ensures your voice messages are clear, concise, and easy to understand.
- Find A Quiet Environment
Background noise can make it difficult for the recipient to hear your voice message. Try to find a quiet room or location before recording your voice message.
- Hold The Phone Close To Your Mouth
The iPhone’s microphone is at the bottom of your iPhone iOS 16. Therefore, holding the iPhone close to your mouth while recording your voice message is important. This method will help you pick your voice clearly.
- Speak Clearly & Slowly
Speaking clearly and at a moderate pace is important when recording a voice message. However, avoid speaking too quickly and mumbling, as it will make it difficult for the recipient to understand your words.
- Keep It Brief
Voice messages should be short and to the point. Try to keep your message a maximum of a minute, and focus on conveying your important point.
- Preview Your Message
Before sending your message, please take a moment to listen to it and make sure the sounds are clear and easy to understand. You can re-record your message if necessary to ensure it’s as straightforward as possible.
Sending Your Voice Message
After recording your messages, you can send your recorded voice message to the recipient by following a few steps.
- Release the microphone icon after recording to send the voice message automatically.
- Tap the “Play” option before sending your audio message to the recipient.
- Slide your finger towards the left while holding the microphone icon to cancel sending your audio message.
Note: It’s important to note that iPhone users can send voice messages via the Messages app only to iPhone users. If you want to send voice messages to non-iPhone users, you must use third-party apps or messengers.
Using Siri to Send a Voice Message
I know everyone wants to work in relaxed positions. Therefore, you might also be thinking: How to Send Voice Messages on iPhone iOS 16 using Siri? You can send your voice messages using Siri too. Here’s how you can do it.
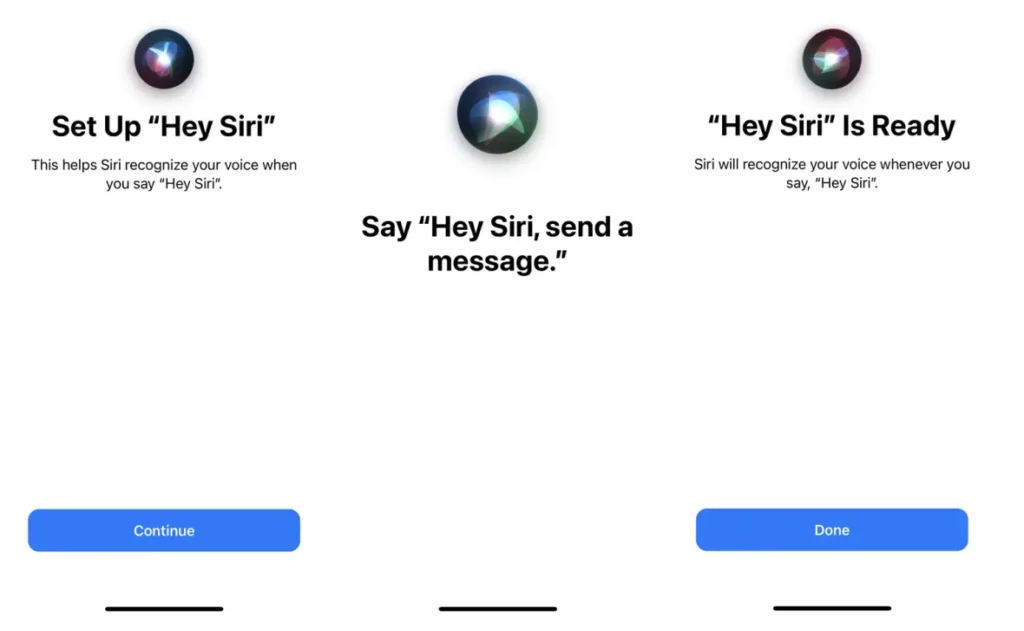
- Activate Siri
To activate “Siri,” say “Hey Siri” if you have enabled the Siri feature, or press and hold the side button on your iPhone.
- Initiate The Command
Once “Siri” is activated, say, “Send a voice message to [contact name].”
- Record Your Message
Siri will prompt you to start recording your message. Speak clearly into the microphone. When you are done, say, “Hey Siri, Stop Recording.”
- Review and Send Your Message
Siri will reply to your message back to you. If you find it perfect, say, “Hey Siri, Send It.” If you are unsatisfied with the message, you can say, “Hey Siri, Re-record ” to start over.
- Confirm The Recipient
Siri will ask you to confirm the recipient’s name, and you can either approve it or correct it.
- Finish The Message
Siri will ask if you want to add anything to the message, such as a subject or text message. You can either add something or say, “Hey Siri, send it” to send the message as is. Your voice message will be sent to the recipient through the Messages app.
Note: It’s important to note that Siri may not always understand your commands correctly. So speak clearly and use the recipient’s full name to avoid confusion. Also, Siri will only work properly if you have a good internet connection. Therefore, use this feature when you have a strong and stable connection.
Tips for Using Siri to Send a Voice Message
- Speak clearly and at a moderate pace.
- Sentences must be short and with focus points.
- Use the recipient’s full name to avoid any confusion.
- Siri will not work properly with a poor internet connection, so you need a stable connection to use Siri.
- Use proper speaking periods to include proper punctuation.
- If you cannot get a proper voice message using Siri, then you need to practice using Siri. You will learn to use Siri within a few moments.
How to Send Voice Messages on iPhone iOS 16? Video Tutorial
Wrapping Up
The voice typing button is relocated in iOS 16, so you must be worried: How to Send Voice Messages on iPhone iOS 16? First, let me tell you the audio message icon is now represented as a microphone icon and is present on the left side of Messages. The audio message icon has now shifted to the iMessage app. You do not need to access any other apps from the Apple store to access iMessages audio message icons.
Were you also worried after not finding the audio message icon in its native place? Please share your reactions and experiences after not finding the audio message icon on iPhone iOS 16. Also, share this post with your friends and inform them of the new location and steps for using the voice message-sending process.
Frequently Asked Questions
1. How to Send Voice Messages on iPhone iOS 16?
You can check for the microphone icon to the left of the Messages field. Select the desired recipient, press and hold the red color microphone icon until you speak, and then release the microphone icon option.
2. How long can a voice message be on an iPhone?
A voice message on an iPhone can be up to two minutes long.
3. Can you send voice messages to Android users?
The Messages app can only send voice messages to other iPhone users. However, you can use third-party messaging apps to send voice messages to Android users.
4. How do I know if someone has listened to my voice message on an iPhone?
On an iPhone, you’ll see a blue waveform next to a voice message that has been played. If the waveform is grey, the message has not yet been played.
5. Can I delete a voice message after I’ve sent it on an iPhone?
No, you can’t delete a voice message after it’s been sent. However, you can slide your finger to the left while holding the microphone icon to cancel the message before sending it.
6. How can I improve the quality of my voice messages on an iPhone?
To improve the quality of your voice messages on an iPhone, speak quietly, hold the phone close to your mouth, speak clearly and briefly, and review your message before sending it.
7. Can I use Siri to send voice messages on an iPhone?
Yes, you can use Siri to send voice messages on an iPhone. Activate Siri, say, “Send a voice message to [recipient’s name],” and dictate your message.