Since the Discord Verify Member Button is a relatively new feature, most of you Discord server owners might not know what it is and what it does. Since Discord is swiftly changing (for the better, apparently), we need to know what all these new features are.
As you might have heard, Discord is removing numbers from usernames and making you pick a new one. So among all these changes come this member verification feature.
Don’t know what it is or what it does? Lucky for you, my article explains everything about this Discord Verify Member Button feature and how you can make the best of it.
In This Article
What is the Discord Verify Member Button?
The Discord Verify Member button is an option that enables the members of a Discord server to be verified for a personalized onboarding experience. So if you own a Discord server, this is an amazing feature to make use of to give your members something to feel more at home!
P.S. When you right-click any member, you get an option to verify them.
What Does Verify Member Mean on Discord?
So we know that the Discord Verify Member Button helps you verify the members of your Discord server, but what does verify member even mean on Discord?
Since Discord has changed how the verification process works for the members of a server, it gives server owners more control.
Earlier, if a member needed to be verified to talk in the server but couldn’t verify, you (the server owner) could simply bypass this verification requirement by giving them a role in their server.
Now, the Discord Verify Member button helps server owners verify members without having to fuss about assigning them a role. You just click on verify member, and it’s done.
The Discord Verify Member Button is a big boon for temporary members; read next to see how.
What Does the Discord Verify Member Button Do?
A lot of the time, you have people joining your voice channel. And if there are a lot of them invited, it can be hectic if everyone just talks and you have no control, right? Well, that’s what the Discord Verify Member Button helps you with.
Using the Discord Verify Member Button, you can give them a “temporary membership” to your server or voice channel. What it does is that when they are invited to your voice server, you can have it so that when leave the voice channel, they are removed from the server.
So basically, you can temporarily verify a member with the Discord Verify Member button.
How to Make Discord Verify Member Button | Set Up Discord Verify Member System
Here’s how to create and set up a Discord verification system hence, how to make the Discord Verify Member Button.
CREATE MEMBER ROLE
- Go to your Server title and select server settings.
- Under Roles, select Role name & color,
- Scroll down and enable “display role members separately” and disable the “@mention” option
- Switch to the Permissions tab at the top and clear all permissions.
- Make sure this Role you created is above @everyone but below all others, and save
- Click on @everyone, Remove Permissions, and Save
CREATE CHANNEL FOR VERIFICATION
- Right-click on the side panel with channels and click on create channel.
- Select the Channel type and give it a name. (eg, Rules for New Members, because you might want to use it to explain rules and such to new members)
- Type and send the verification message you want every new user to get.
- Right-click on the sent message to Copy ID (See the next set of steps if you don’t see this)
How to Copy ID:
- User settings
- Advanced
- Enable developer mode
- Now you’ll see Copy ID.
CARL BOT
- Head to the Carl bot website.
- Click on Invite at the top and sign in to your Discord account.
- Choose your server and continue.
- Authorize the bot and select your server again.
- Click on the reaction role below “Utility”
- Select User ID and paste the ID you copied
- Select the channel you want to send your messages in (eg, in my case, it’s Rules for New Members)
- Select the emoji you want members to use for verification, eg The Tick
- Select “Option” and choose the Verification role (member)
- Type the verification message and verify.
- Leave the next 2 boxes blank and create.
- Return to Discord.
Users will now need to click the reaction button (the emoji) to get access to your server.
SERVER SETTINGS
- Click on the server title and go to the Roles page.
- Drag the Carl bot role above the members’ role.
- Right-click on the channel and edit the channel.
- Go to Permissions > Advanced Permissions
- Enable “view channel; and “read message history,” and Enable add reactions
- Disable send messages and save
- Next to these settings, under advanced, select Carl-bot under roles/members and save.
CREATE COMMUNITY
- Next, click on the server title and again go to server settings.
- Click on enable community under community and get started
- Enable both options and save
- Select Rules in the drop-down list next.
- Enable both options and agree and finish.
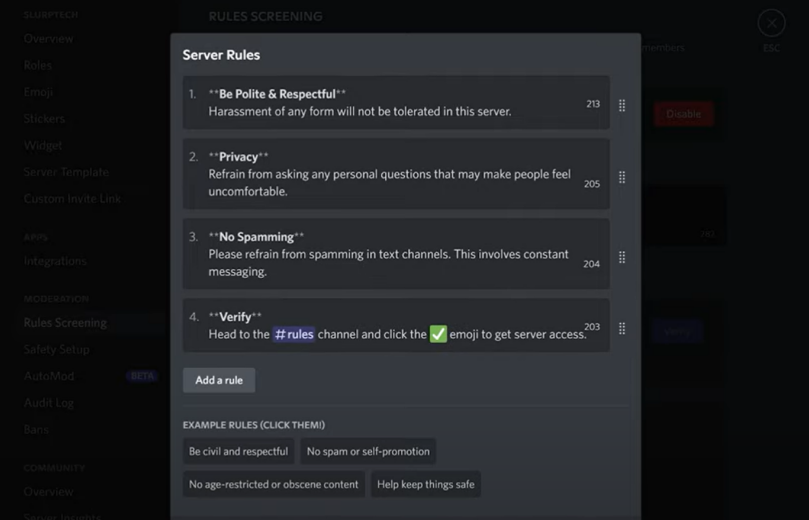
- Go to Rules screening in the sidebar.
- Click Enable and proceed.
- Add a description and get started.
- Add rules and explain how to get verified (the emoji reaction) and save
- Under the welcome screen in user settings, select Add a channel.
- Select your channel name (Rules for New Members), and under “What do people do,” give a description of the emoji rule
- Enable welcome screen
Watch How to Make Discord Verify Member Button
Wrapping Up
So now that you know more about the Discord Verify Member Button, I bet you’re ready to improve your server experience today. Comment to let me know how I helped you and if you’d like us to join your Discord server!
Happy Streaming!