Are you unable to download your past month’s musical receipt? If this is the issue you are facing with your Apple Music Receiptify, this article is for you. I will be covering the “Apple Music Receiptify Not Working” issue in today’s article, along with the possible fixes.
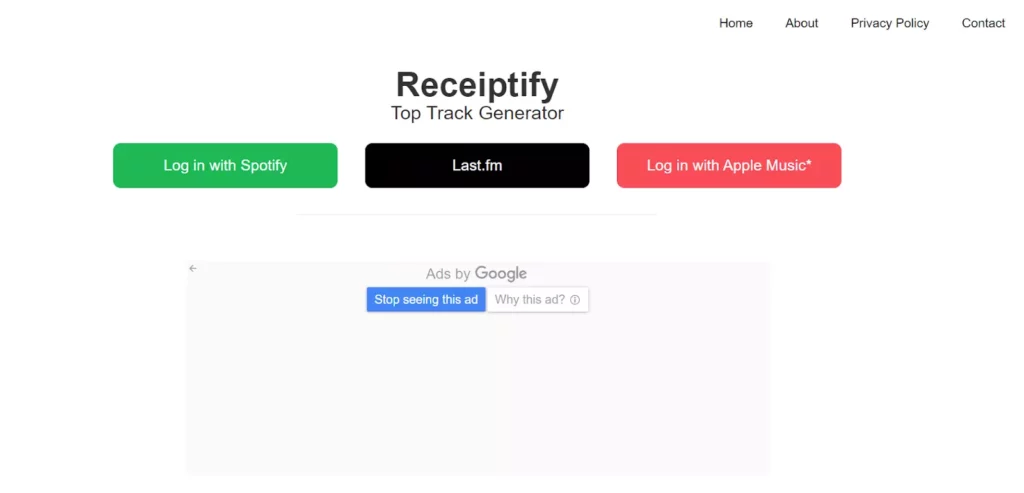
Receiptify, the web application that generates musical receipts with names of music tracks you have listened to lately, works with 3 music streaming services- Apple Music, Spotify, and Last.fm accounts. Therefore you can download your Spotify Receiptify and Last.fm Receiptify as well using the same web app. This online app generates realistic receipts with the names of tracks you listened to once you log in with your Apple Music, Spotify, or Last.fm account.
So without further ado, let’s jump into the article and learn why Receiptify is not working with Apple Music and how to fix Apple Music Receiptify Not Working issue. Why wait, then? Let’s begin!
In This Article
Why is Apple Music Receiptify Not Working?

The blocked pop-up is the most common reason for Apple Music Receiptify Not Working. If you find that when you try to log in with Apple Music on Receiptify, nothing happens, this is all due to your settings that have block pop-ups enabled.
Another possible reason could be increased traffic—many a time when a website experience a sudden surge in the number of users.
Moreover, you can only get one receipt named Heavy Rotation if you log in with Apple Music, unlike Spotify and Last.fm users. Instead of the past month, six months, and all-time receipts as Apple Music users can generate only Heavy Rotation receipts. This is because Apple Music’s API doesn’t provide this type of information. In Heavy Rotation, you only get to see your most played tracks, albums, playlists, etc.
Also, Read 5 Simple Steps to Get Receiptify Apple Music: Taking Control of Your Tunes
How to Receiptify Not Working With Apple Music?
Depending on the above-stated reasons for Apple Music Receiptify Not Working, I have mentioned a few fixes that will help you to resolve the issue. So go ahead and try these fixes out to fix the Apple Music Receiptify Not Working issue.
Method 1: Fix Apple Music Receiptify Not Working by Disabling Block Pop-Ups Setting
Blocked Pop-Ups are the most common reason for Apple Music Receiptify Not Working. Therefore to fix the issue, you need to disable this setting. And below, I have mentioned ways of disabling Block pop-ups on iOS devices, Mac and Chrome.
How to Disable Block Pop-Ups on iOS?
To disable block pop-ups in your device, follow the steps stated below:
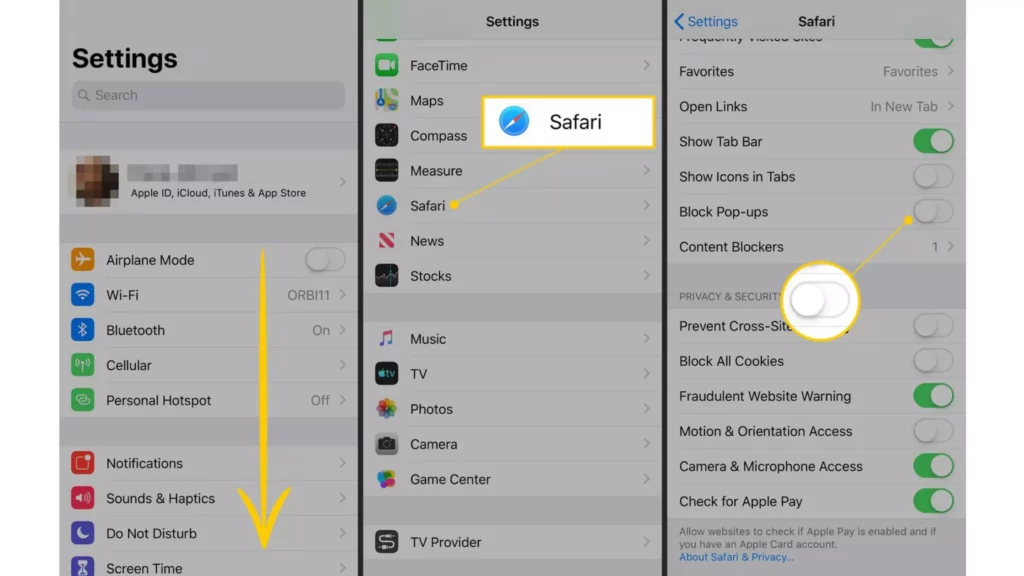
Step 1: Open Settings on your iOS device.
Step 2: Scroll down and tap on Safari.
Step 3: Head to General under Safari.
Step 4: Turn the toggle off next to Block Pop-ups.
And with you are done! This is how you can disable Blocked Pop-Ups on your device. So next time when you try to log in to Receiptify with Apple Music, don’t forget to disable the blocked pop-up setting in Safari.
Also, read How to Get Receiptify Spotify: 7 Easy Steps to Generate Musical Receipts!
How to Disable Block Pop-Ups on MacOS?
To disable block pop-ups in Safari on macOS, follow the steps stated below:
Step 1: Go to the Receiptify web page.
Step 2: Tap on the Safari option from the top menu bar.
Step 3: Select Settings for the Receiptify.herokuapp.com option.
Step 4: Then tap on Allow next to Pop-up Windows from the dropdown menu.
Step 5: Now refresh the page.
Step 6: Again, log in with Apple Music.
And with you are done! This is how you can disable Blocked Pop-Ups on your MacOS. So next time when you try to log in to Receiptify with Apple Music, don’t forget to disable blocked pop-ups in Safari.
How to Disable Block Pop-Ups on Chrome?
To disable block pop-ups in Chrome, follow the steps stated below:
Step 1: Go to the Receiptify web page.
Step 2: Tap on Log in with Apple Music.
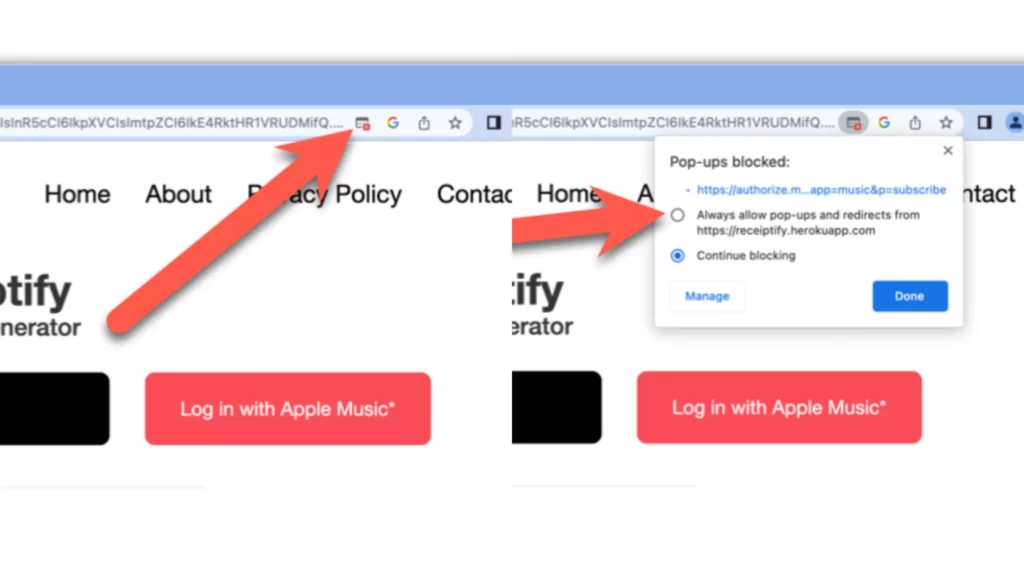
Note: You will be notified that Chrome has blocked a pop-up.
Step 3: Tap on the small icon at the far right of the search box.
Step 4: Select Always allow pop-ups and redirects.
Step 5: Tap on Done.
Step 6: Again tap on Log in With Apple Music.
And with this, you are done! This is how you can disable Blocked Pop-Ups on your Chrome browser. So next time when you try to log in to Receiptify with Apple Music, don’t forget to disable the blocked pop-up setting in Chrome.
Also, read What Do the Stars Mean on Apple Music: Here is What You Need To Know!
Method 2: Clear Cookies and Site Data to Fix Apple Music Receiptify Not Working
Sometimes even if pop-ups are not blocked, you can face Apple Music Receiptify Not Working issue. And this can be the result of heavy traffic on the site. For this, you can try refreshing the site a couple of times to get your Apple Music Receiptify. But if this won’t work, you need to clear your cookies and site data. Below I have provided you with steps to clear cookies and data from Safari and Chrome.
How to Clear Cookies and Site Data From Safari?
To clear cookies and site data from Safari, follow the steps stated below:
Step 1: Go to the Receiptify web page.
Step 2: Tap on the Safari option from the top menu bar.
Step 3: Select the Privacy option.
Step 4: Then tap on Manage Website Data.
Step 5: In the search bar, search Receiptify.
Step 6: Then tap on the Receiptify.herokuapp.com option.
Step 7: Tap on the Remove button.
Step 8: Then tap on Done.
And you are done! This is how you can clear cookies and other data on Safari. Now refresh the page and log in with Apple Music again. If the issue still persists, you can move to the next fix.
How to Clear Cookies and Site Data on Chrome?
To clear cookies and site data on Chrome, follow the steps stated below:
Step 1: Open Google Chrome on your PC.
Step 2: Tap on the three dots next to your profile in the top right corner.
Step 3: Tap on More Tools.
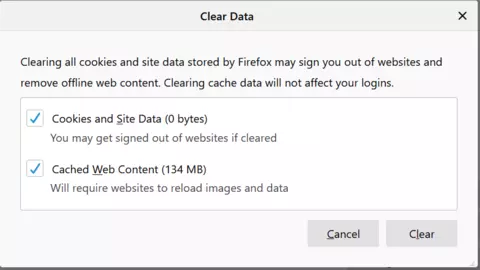
Step 4: Select Clear browsing data.
Step 5: Select the time period.
Step 6: Now tap on Clear data.
And you are done! This is how you can clear Cookies and Site Data on Chrome.
Also, Read Apple Music This Content is Not Authorized Error: Solve With 8 Fixes RN!
Method 3: Use Another Other Device to Fix Receiptify Not Working With Apple Music

If none of the above methods works, it is advisable to use some other device. For example, if you were trying to generate Apple Music Receiptify using your phone, try using your PC and vice versa.
Method 4: Fix Receiptify Not Working With Apple Music By Using a Different Browser
Using a different browser other than the one you are using is another way to fix Apple Music Receiptify. Try to use Chrome or Firefox and see if it works and helps you to generate your musical receipt.
Also, Read Preorder Apple Classical Music App: World’s Largest Classical Music Catalog!
Wrapping Up
With this, I have come to the end of this blog, and I hope you now know how to fix Apple Music Receiptify Not Working. So without any delay, try these fixes out and tell me in the comments section which of them worked for you. And yeah, for any further queries related to Apple Music, you can always comment in the comments section below.
So, guys, that is it for today. Take Care! And keep visiting our website, Path of EX, for more such queries related to Social media, Gaming, and Technology. Till then, Bye! Bye!