
Though using passwords is a great option to safeguard signing into your device, logging in with passwords every time your system sleeps can get inconvenient at times. So, if you’re looking for ways to set up Microsoft Windows auto-login on your PC, you’re at the right spot.
Along with no further need to remember your account password, skipping the login screen can give an incredibly convenient experience. When you skip this screen, you can save a few seconds in the bootup process and jump straight into using the apps and programs on your Windows 10 PC system.
In this article, you’ll figure out how to exactly enable and set up Windows 10 auto login with 3 different methods including the simple and easy User Accounts method. But, remember that enabling auto-login through any of these methods can open your PC to security compromises.
However, if you’re the sole user of the PC on a private network, this auto-login feature is a great add-on if you feel the Windows 10 login is an unnecessary step in the boot-up process. Read along the article to know more about the different methods you can use to set up Windows 10 auto-login on your PC.
In This Article
How to Setup Windows 10 Auto Login?
In order to bypass the login screen on the Windows 10 system, you can use the User Accounts or Settings method. In case, these don’t work for you, head over to the Registry Editor method but make sure to properly follow through with each step mentioned in this method. Without further ado, let’s begin the guides on how to set up Windows 10 auto-login.
#1 How to Setup Windows 10 Auto Login Using User Accounts
Using this method of User Accounts is one of the quickest and easiest ways to set up Windows 10 auto login in order to bypass the annoying password screen. Here’s how you can set up Windows 10 auto login and save your time by getting straight to your desktop:
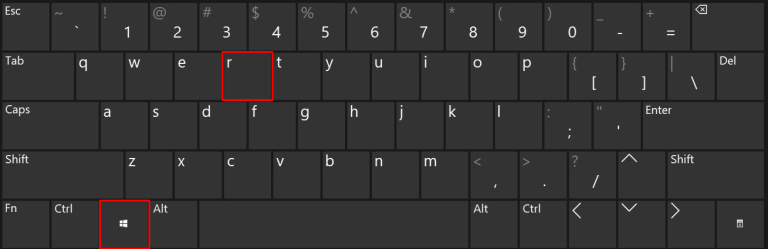
1. The first thing you need to do is to press the Windows key + R.
This will launch the Run dialog box on your system.
2. Type netplwiz in the Run window dialog box.
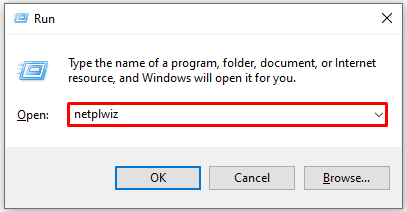
3. Now, hit Enter or click the OK button to open the User Accounts window tab.
4. Select your account among the list of Users for this computer section under the Users tab.
5. Uncheck the Users must enter a username and password to use this computer box in order to disable password protection.
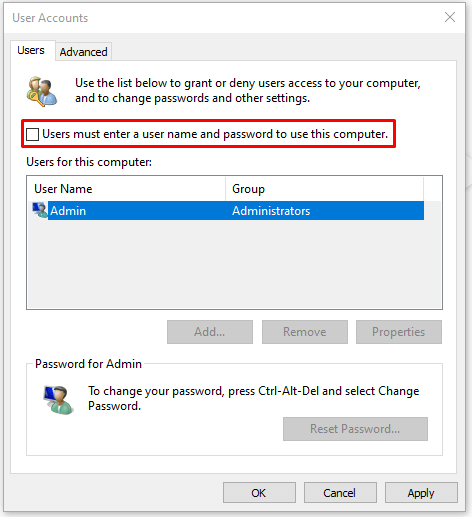
6. Continue by clicking on the Apply button at the bottom-right of the window.
7. Confirm your action by selecting the OK button
A popup window will appear asking for your username and password for confirmation.
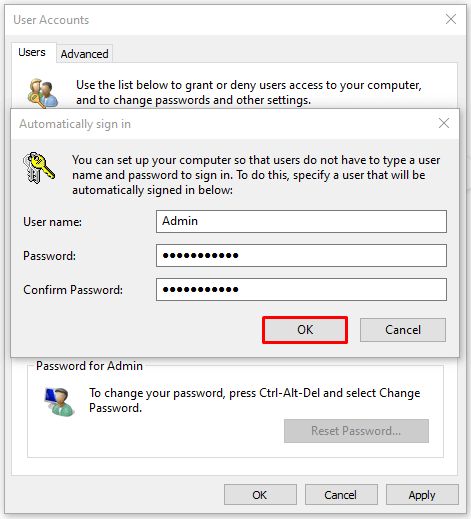
8. Enter the required information and click on OK.
There you have it, after restarting, you can now sign into your computer without needing to enter any password.
#2 How to Setup Windows 10 Auto Login Using Settings Menu
Using the Settings Menu is likely the most well-known method to enable your Windows OS to boot without needing to log in. Here’s how to change the sign-in options and setup Windows 10 auto login through the Setting app on your system:
1. Open Start menu on your PC.
2. Launch the Settings app by clicking the gear (or cog) icon.
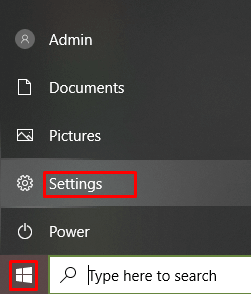
Alternatively, you can right-click on the Start menu and select Settings among the options listed in the menu.
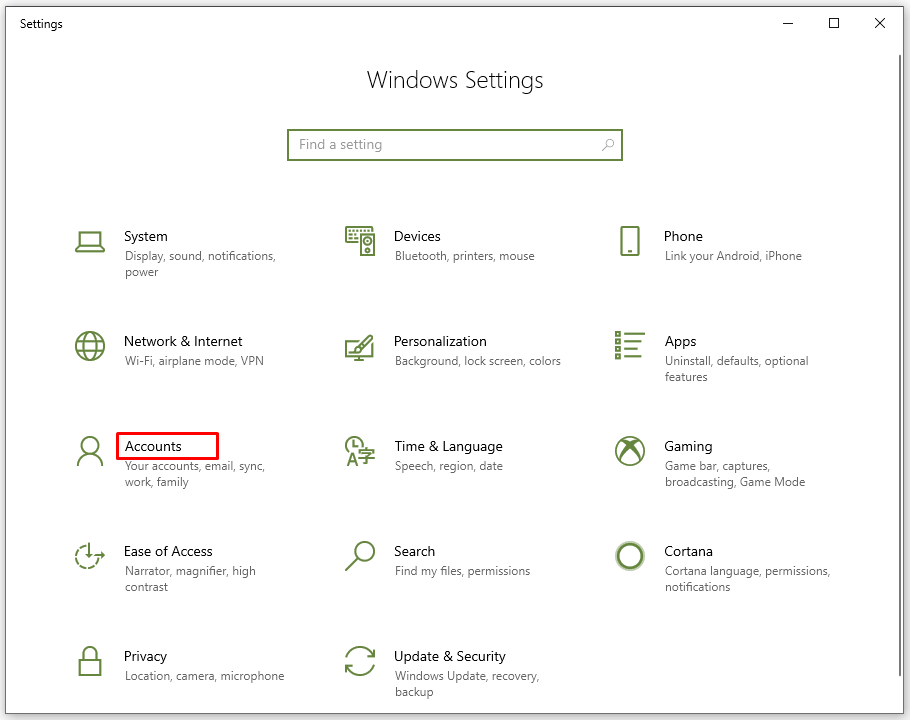
3. Once in the app, locate Accounts and click on it.
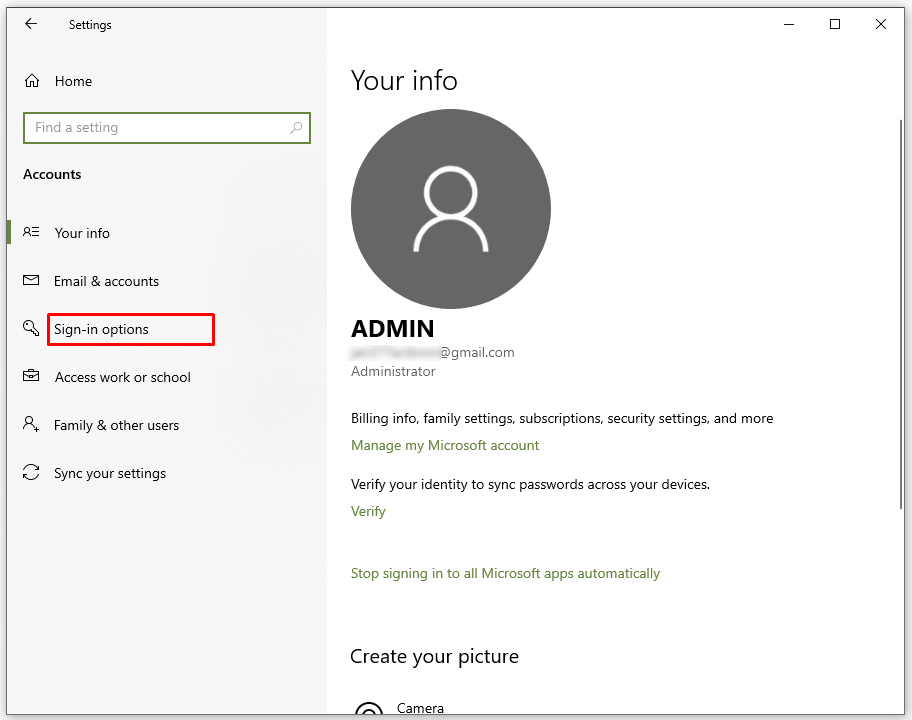
4. Navigate the left side of the menu and click on Sign-in options.
5. Click Require sign-in and select Never in the drop-down options.
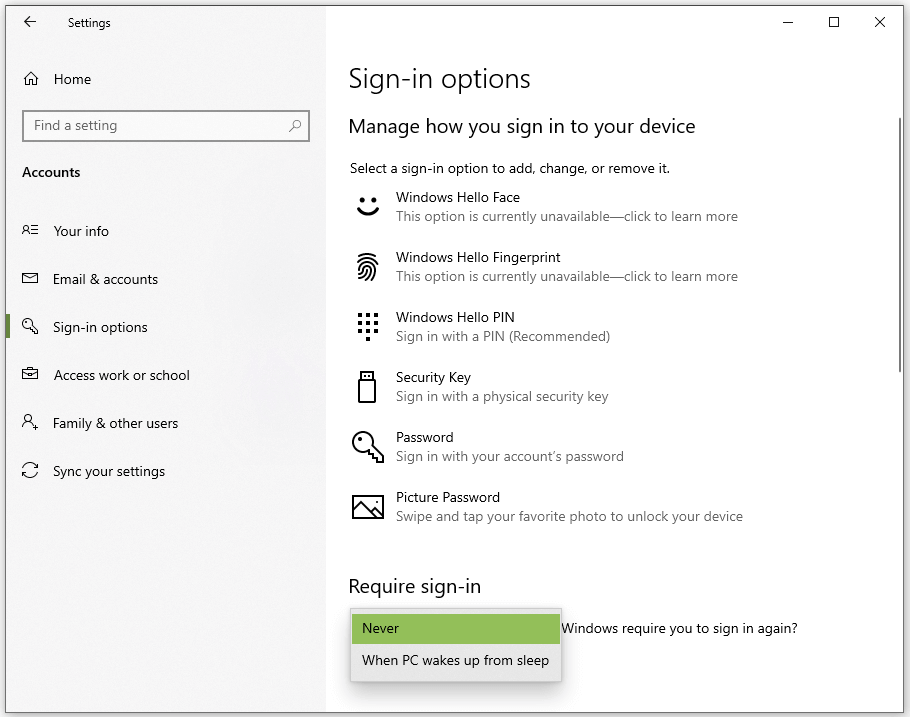
6. Again, under the Sign-in options, head over to the Windows Hello PIN section and select the Remove button.
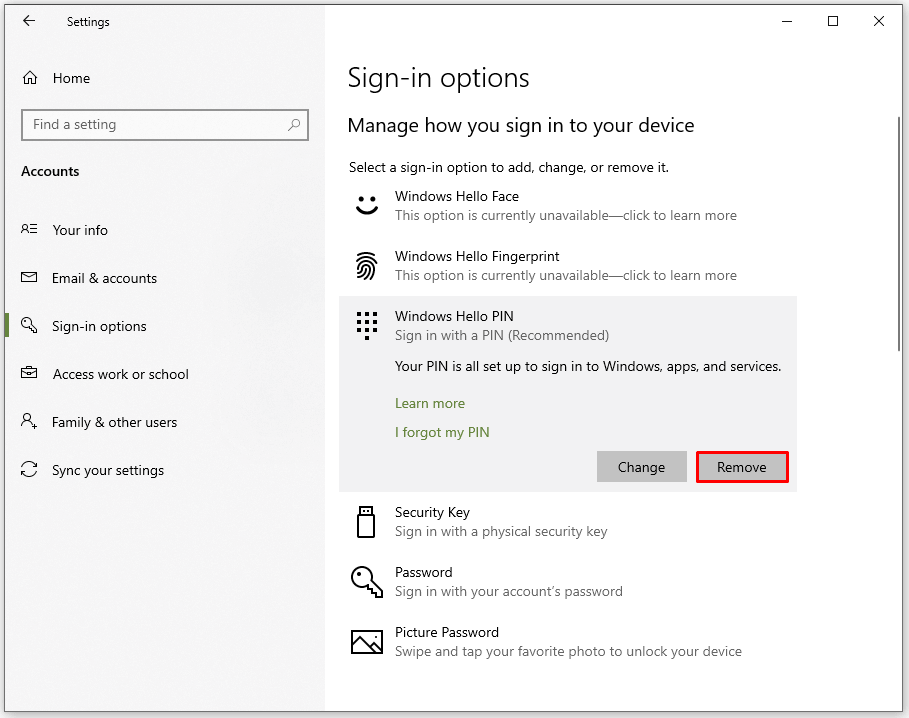
Once performed correctly, this method should do the trick to bypass the login screen altogether.
#3 How to Setup Windows 10 Auto Login Using Registry Editor
If nothing else is working out, you can give this method a shot to setup Windows 10 auto login. Keep in mind that using this method can lead to complications in the OS if you perform any of the steps wrong.
So, it’s advisable to perform a backup and create a recovery point of the registry on your computer before following through these steps:
1. The first thing you need to do is access Registry
Launch the Run app either through the Start menu or by pressing the Windows logo key + R.
2. Type Regedt32.exe in the Run dialog box.
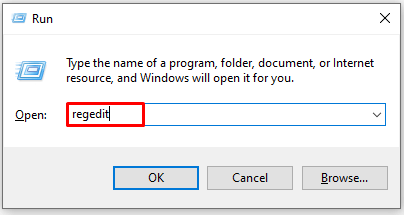
3. Hit Enter or click the OK button to open the Registry Editor Tool.
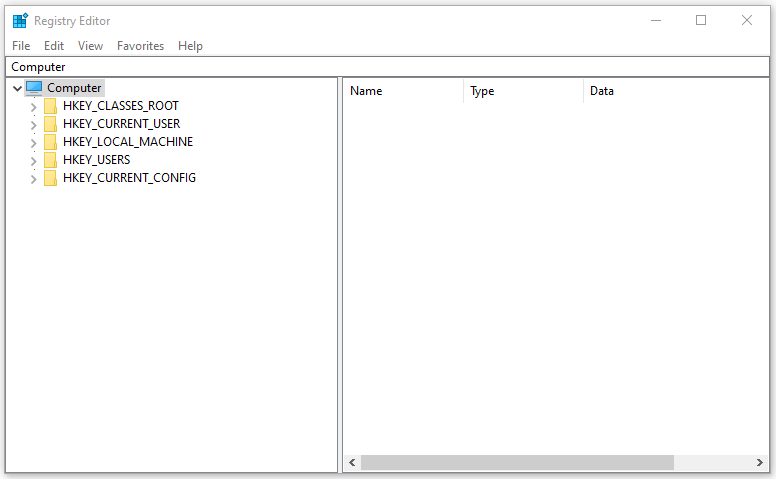
You will be prompted with a User Account Control window, just press the Yes button to continue with the steps to setup Windows 10 auto login.
4. The next task is to find the right subkey.
Just navigate to HKEY_LOCAL_MACHINE > SOFTWARE > Microsoft > Windows NT > CurrentVersion > Winlogon to reach the exact folder location.
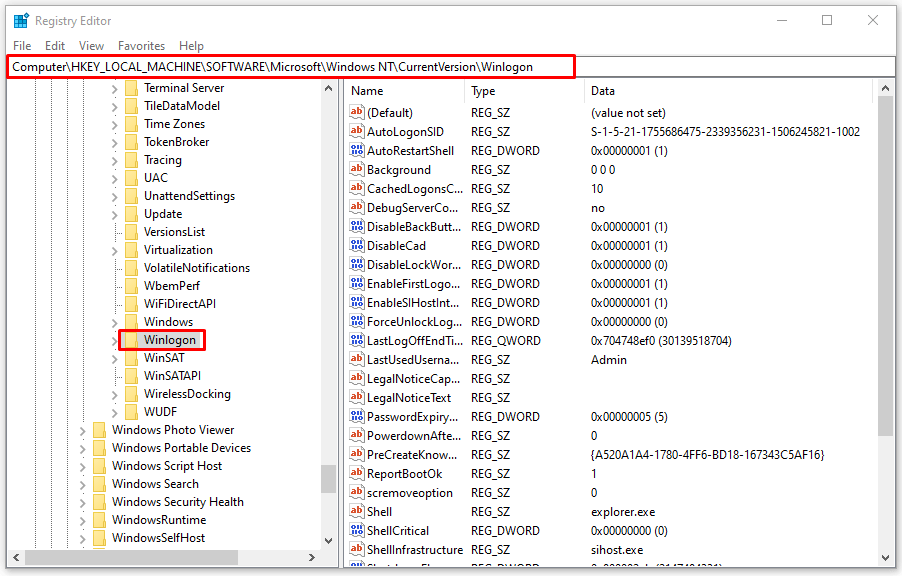
Alternatively, you can simply copy-paste: HKEY_LOCAL_MACHINE\SOFTWARE\Microsoft\Windows NT\CurrentVersion\Winlogon in the Registry Editor and then hit Enter.
5. Now, look for the DefaultUserName entry in the right side of the window and double-click on the entry.
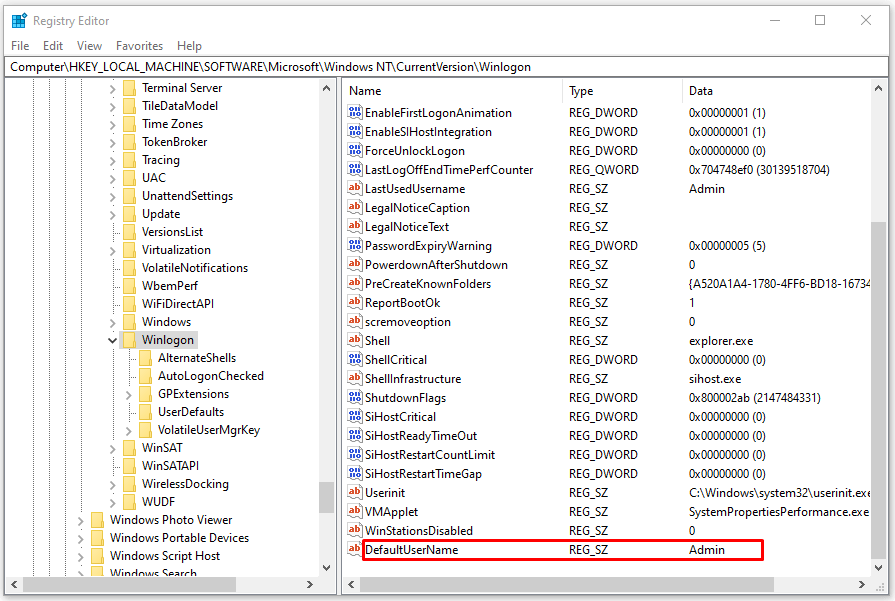
Make sure the username is correct in the value box and select OK.
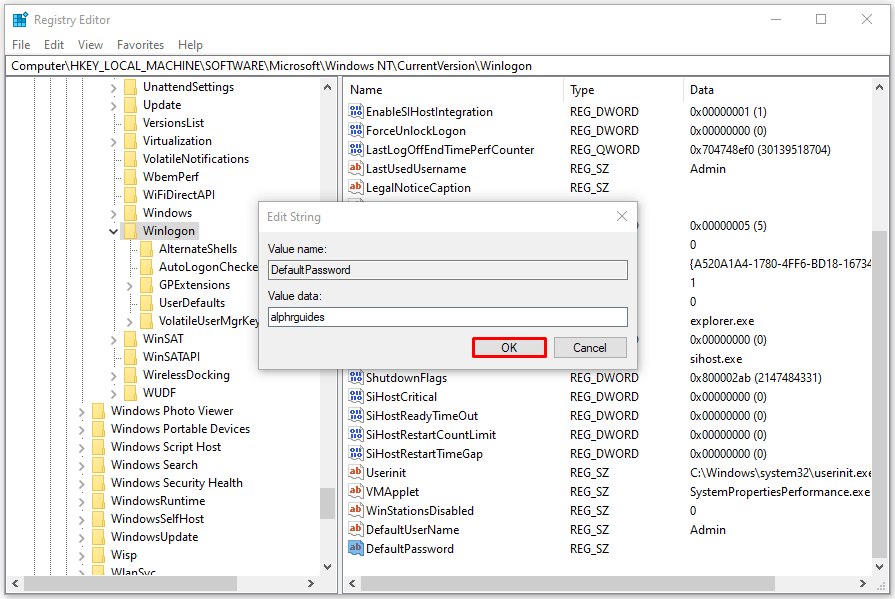
6. Again, locate and double-click on the DefaultPassword entry in the right side of the window.
If the said entry does not exist, you can create it manually using these steps:

- Within the right-side menu, right-click on an empty space or head over to the Edit menu.
- Click New and then select String Value.
- Rename the new value to DefaultPassword and click Enter.
7. Enter your password in the Value data box when prompted after double-clicking.
8. Continue by clicking the OK button.
9. Finally, locate and double-click on the AutoAdminLogon entry in the right window pane.
If there is no such entity, then manually create a new value by following these steps:
- Head to the Edit menu.
- Click New and select String Value.
- Enter the new string value as AutoAdminLogon and hit Enter or click the OK button.
10. After double-clicking, type the number “1” in the value data box under the Edit String tab.
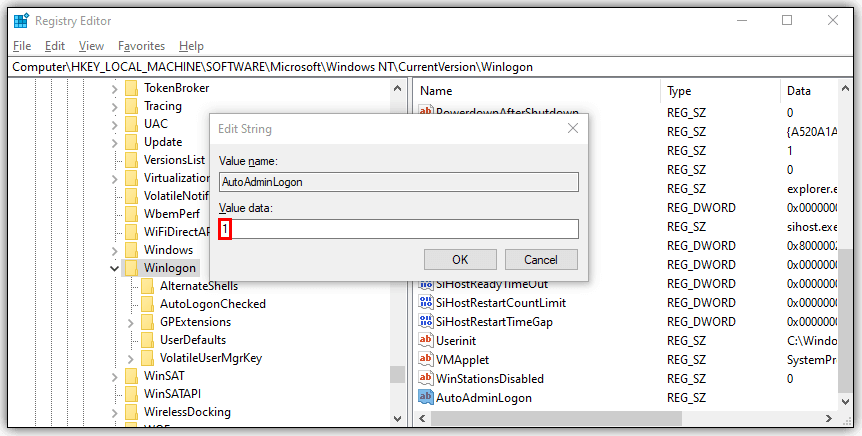
11. Click the OK button again and exit the Registry Editor.
12. Restart your PC for the changes to take effect.
Wrapping Up
This concludes our article to bypass the login screen and enable auto-login on your PC. We hope that the guides to set up Windows 10 auto login were easy enough for you to understand and follow through. Let us know your choice of method to enable auto-login on your device, in the comment section below.
Feature Image Credit: YouTube