We all come across this situation at least once in our lifetime where we need to click the picture as well as be in it. That’s where you need to know how to use the timer on iPhone camera. The long hands might work, but you don’t want to look like the guy from fantastic four every time. To take care of such tricky situations, we will learn how to use the timer on iPhone camera.
There are many sticky situations where one needs to know how to use the timer on iPhone camera. For instance, you want to pose near an object that you really like, and there is no one to take the picture for you or a perfect group photo that’d be incomplete without you. There is a way you can do all of this without taking the help of another person or gadget. I personally love a camera timer more than any other feature within the iPhone camera.
I will describe the step-by-step process of using the timer on an iPhone camera. Read till the end to know how to use the timer on iPhone camera like a pro. There are different timer settings that you can use to fit the situation you need to take care of.
In This Article
How to Use the Timer on iPhone Camera?
Before getting into the process, let me tell you that there are two timer settings. You can call these ‘the countdown.’ Basically, if you need a longer time to return to the desired spot, you need a longer countdown; if you don’t, you need a shorter countdown. Follow these steps to use the timer on the iPhone camera:
1. Unlock your phone.
2. Launch the Camera app from the home screen.
3. Set the iPhone for it to take the picture the way you want it to.
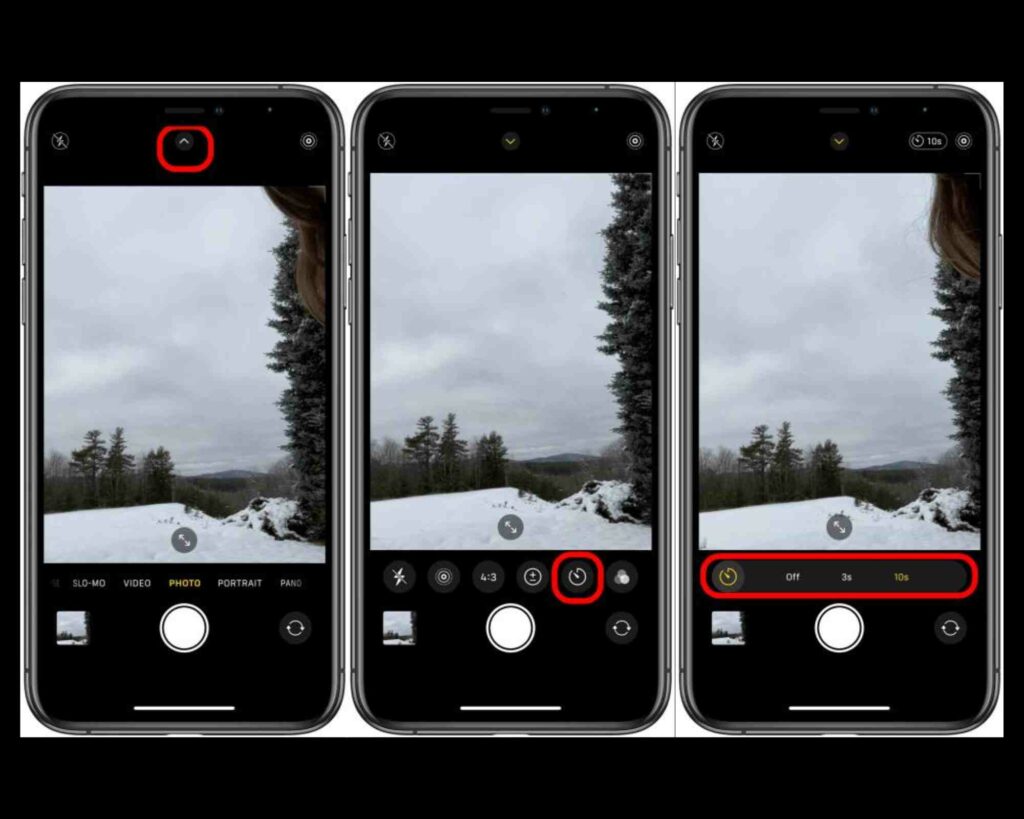
4. Tap the downward arrow icon at the top of the screen.
5. The menu above the shutter button should change, and you should see a Timer icon.
6. Click on the Timer icon.
7. Select a countdown for the timer (3 seconds or 10 seconds are your options)
8. Tap the shutter button of your camera to start the timer. If you want to stop the self-timer at any point before the picture is taken, tap the stop button.
9. To access the photo taken by your iPhone, go to the Photos app.
10. Select the photo taken with the self-timer.
11. Scroll through the 10 different burst images taken by your iPhone and select the best photos you find.
12. Tap Done in the upper right corner.
How to Use the Timer on iPhone Camera?
Wrapping Up
Using the timer feature on your iPhone isn’t rocket science; it is just a few clicks away. The difficult part is finding a good angle and placing the phone to take the picture as desired. You can use the timer on your iPhone camera to click perfect group photos or pictures of yourself without needing help from anyone else. Having said all that, I am sure that now you know how to use the timer on iPhone camera.
Frequently Asked Questions
How do I set a timer on my iPhone 13 Camera?
To set a timer on your iPhone 13 camera,
Open the Photos app > set an angle to take the picture you’d like to take > tap the arrow on the top of the screen> the menu above your shutter button should change, and you should see a Timer icon > tap the Timer icon > Choose between the 3-second and 10-second timer > press the Shutter button > hurry into position > the camera’s flash will blink with the countdown > Voila! You got your picture.
Does the iPhone 13 pro Camera have a timer?
Yes, it does.
How do I take hands-free pictures with my iPhone 13?
Open the Photos app > set an angle to take the picture you’d like to take > tap the arrow on the top of the screen> the menu above your shutter button should change and you should see a Timer icon > tap the Timer icon > Choose between the 3-second and 10-second timer > press the Shutter button > hurry into position > the camera’s flash will blink with the countdown > Voila! You got your hands-free picture on your iPhone 13.