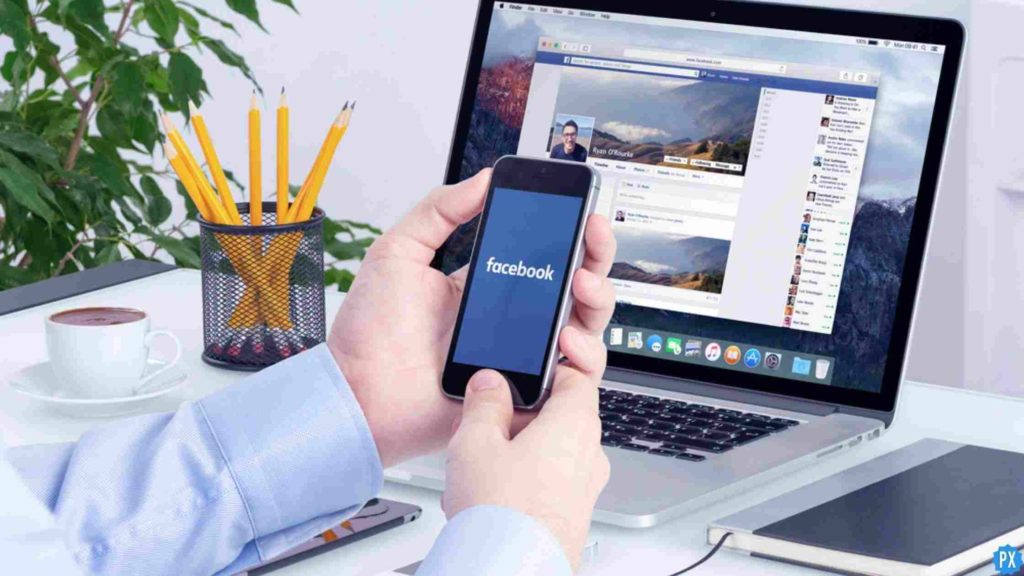
Facebook has always amused its users with its advanced features. From running a personal profile to a business page, everything has become easier for us. You can showcase your talent as well as promote the business products. To be successful on Facebook, create engaging content for your audience. To enhance audience engagement, interact with your audience. You can interact better with going live on a Facebook page. If you are worried about how to do it, learn how to use Facebook live producer and stay connected with your audience.
Marketing strategies are important for the business to grow on a social media platform. You might have seen unlimited Facebook business pages, but you have to nurture your audience to boost audience engagement. To achieve this objective, enjoy live streaming with the audience on the Facebook platform.
Let’s not make it easier for you. Quickly read all the subheadings below and avail the benefits by learning how to use Facebook Live Producer. At the end of the article, you will say I can even go live.
In This Article
How To Use Facebook Live Producer | Step-By-Step Guide
As a business owner, you want to get powerful social media results, get it done successfully without taking the help of some advertising team, big-budget, posting every day, or using third-party tools. For this, you have to use the amazing Facebook Live Producer tool.
Facebook live producer gives you advanced tools to interact with your audience. You can access it from your desktop. Use Firefox or Chrome browser or go to Facebook Live Producer page. You can go Facebook live on your profile, Facebook business page, or Facebook group.
Let’s get started with how to use Facebook Live Producer with the help of the following steps.
Step 1: Open the Facebook Business page and tap on Live
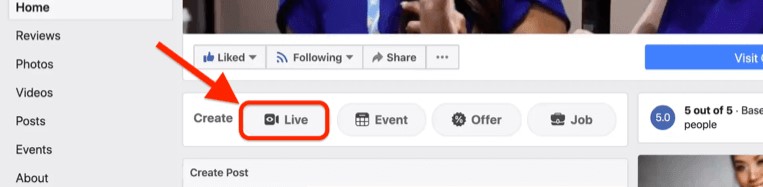
- Open the Facebook Business page.
- Tap on Create and you see the various options beside it like Live, Event, other, job, and three dots icon.
- Tap on Live.
Step 2: Tap on the Post box
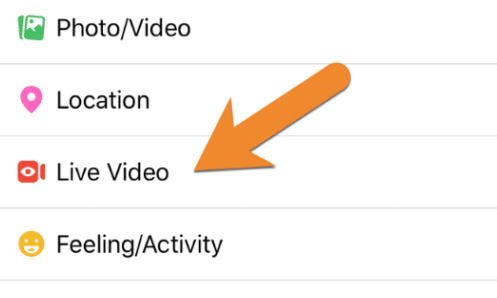
- A new page will appear and tap on the Post box.
- In the Create Post box, tap on three dots.
- Finally, click on the Live video.
Thus, you can go live on your Facebook business page.
How To Use Facebook Live Producer | 6 Simple Steps
Once you have learned how to go live on the Facebook page, you can enjoy live streaming on the Facebook live producer. To go live out of the Facebook business page, learn how to use Facebook live producer.
Step 1: Open the Facebook Live Producer
- Go to the browser and open this link.
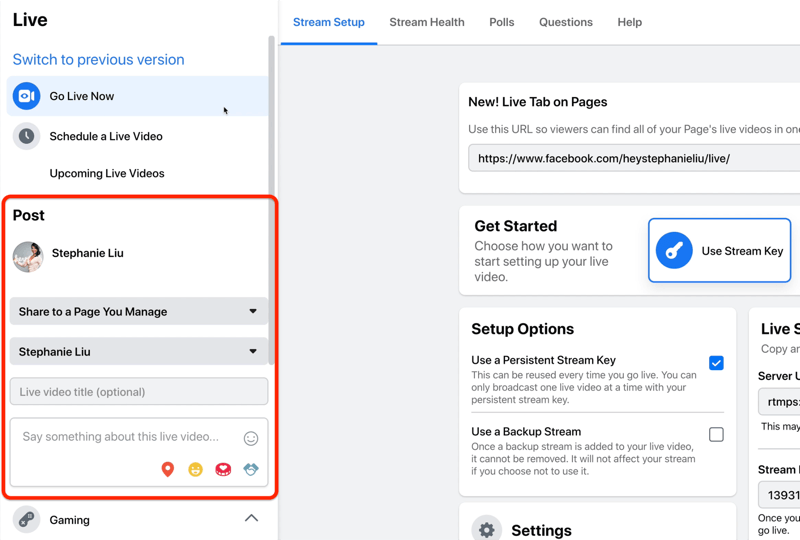
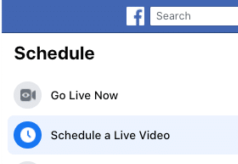
- Go to the left side of the screen and tap on Go live.
- You will see three options in the drop-down menu: Go live now, Schedule Live Video, and Upcoming Live Videos and Events.
Step 2: Tap on Stream Setup
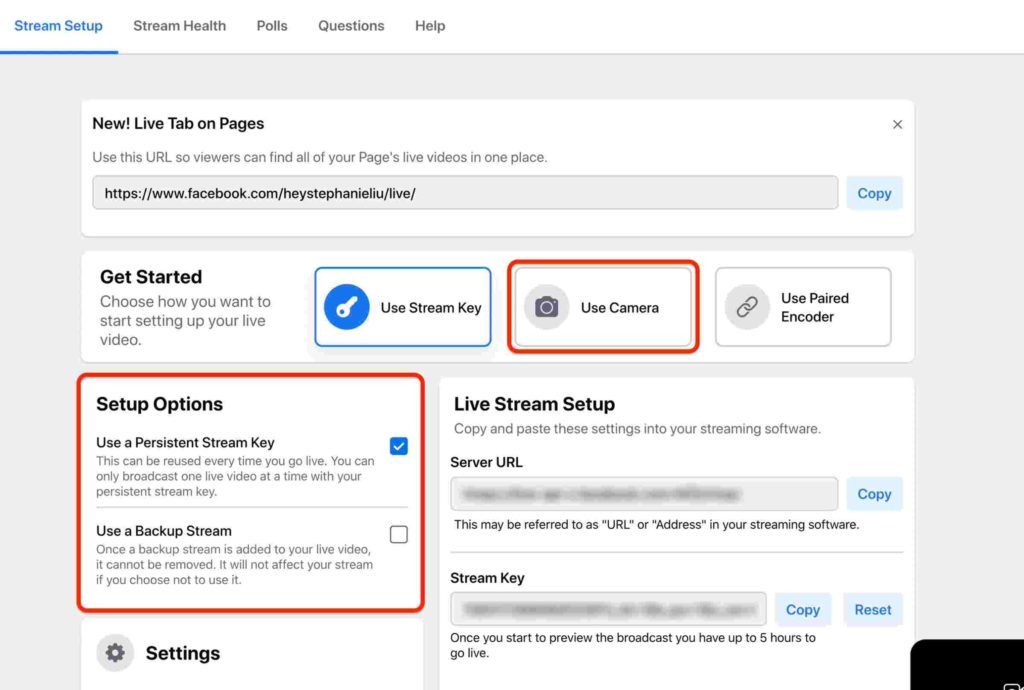
- Now tap on the Stream Setup page, you will see three options near the Get Started option: Use Stream Key, Use Camera, and Use Paired Encoder.
Note:- You can not use Stream Key and Paired Encoder on the Facebook Live Producer. It requires third-party tools.
- Tap on Use Camera.
- You will see a preview of your webcam on the bottom right side of the screen.
- You can also choose other settings like End video if stream stops, Allow embedding, and Unpublish after the live video ends.
- You can turn it On or Off according to your preferences.
Step 3: Adjust Other Settings
- Go to the left side of the screen and tap on Post to the page you manage.
- In the drop-down menu, you see three options: Post on Timeline, Post to Page you manage, and Post in Group.
- Tap any of these options as you want.
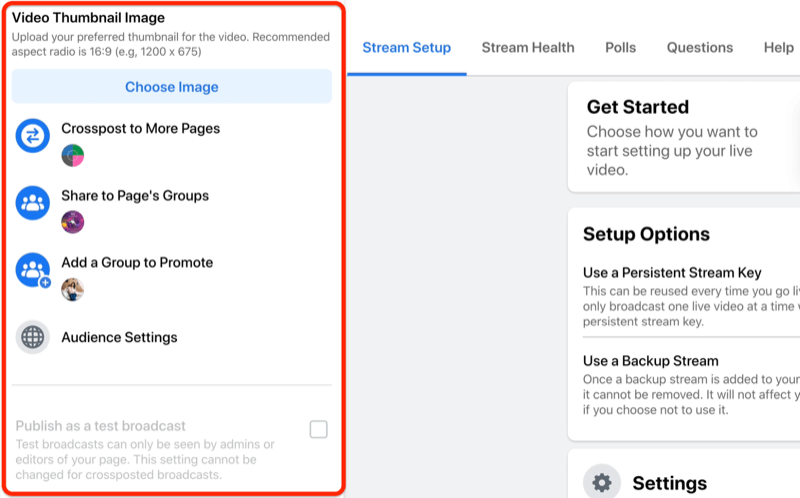
- Now, below that, add a title to your video, add something about your live video, or crosspost to more pages.
- You can also choose the Share pages group.
- Below that, adjust the Audience Settings (Choose age, Allow selected locations and Restrict selected locations).
- If you want to test the live broadcast, tap on Publish as a test broadcast and check the settings before you go live.
Step 4: Tap on Viewing Settings
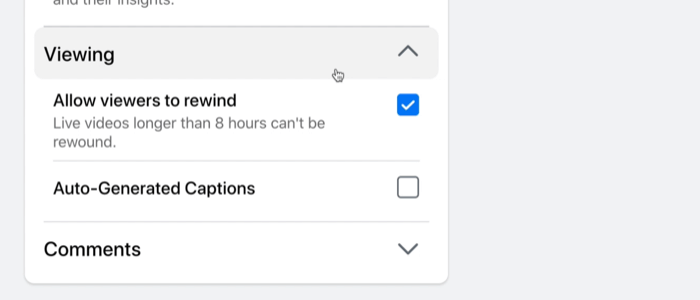
- On the Viewing settings, you will have three options: Allow viewers to rewind, Auto-generated captions, Allow viewers to message you, and Comments.
- If you turn on the Allow viewers to rewind, the viewers will be able to see your video from the beginning if they join late on your live video.
- If you turn on the Auto-generated captions, the viewers will see the subtitles on the screen, whatever you say on the live video.
- If you turn on the Allow viewers to message you, the viewers can message you directly through messenger from your live videos.
- You can select the options in the Comments like:
Followers (Only your followers will be able to leave comments).
Slow (Commenters will only be able to comment every 10 seconds). Discussion (Only comments over 100 characters will be shown).
Restricted (Commenters must have accounts that are at least 2 weeks old).
Protected (Commenters must have followed you for at least 15 minutes).
Step 5: Setup Camera Settings and other Settings
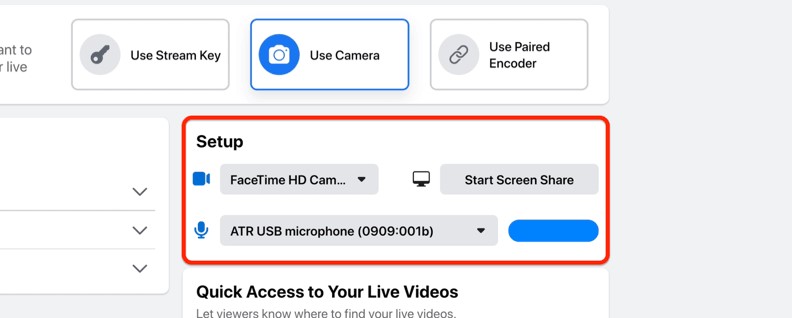
- Now choose the webcam and microphone.
- You can also tap on the Start Screen Share. If you select Start Screen Share, you can not turn it on or off during a live broadcast.
- You can also add Polls and Questions to your live videos. These options will appear on the top of the screen.
Step 6: Tap on Go Live
- Finally, tap on Go live.
You can also schedule your live video according to your scheduled date and time on the Facebook live producer. For this, go to the left side of the screen and tap on Schedule Live Video.
Thus, with the use of the above steps, you learn how to use Facebook live producer.
Wrapping Up
Thus, the Facebook Live Producer will help you drive all the traffic to the business website. This creates a good image for your business and helps you run the business smoothly. So what are you waiting for? Try these features on your live broadcast. Share the article with your friends and let them know how to use Facebook Live Producer. Stay tuned.