“I’m trying to recover messages sent to me on Messenger. I didn’t know they could be taken back, so I didn’t take screenshots…Is there any other way to retrieve these messages?” writes a user on Reddit. This is just one case; many are still unaware that Messenger messages can be taken back, just like Instagram and WhatsApp messages. This has made users look for ways to see unsent messages that the sender removed before they can even read them. In this article, I will tell you how you can see unsent messages on Messenger. So come along!
Facebook made messaging much more convenient with Messenger by allowing you to exchange messages from Facebook and Instagram. You can even have group chats on the Facebook Messenger app besides having normal one-on-one conversations. But what about the unsent messages on Messenger? Let’s find out.
Without further ado, let’s jump into the article and find out how to see unsent messages on Messenger. Why wait, then? Let’s begin!
In This Article
Is There a Way to See Unsent Messages on Messenger?
There is no “official” way to see unsent messages on Messenger.
One of the help center’s blogs stated, “You can permanently unsend a message that you’ve sent or just hide a message from your view” using the Remove or Unsent message feature on Messenger. Even when you download a copy of your Facebook data, you will find that some messages were unsent in the chat, but you won’t find out what those messages were.
However, a few workarounds will help you see unsent messages on Messenger, which I stated in the next section.
How to See Unsent Messages on Messenger?
Though there is no direct or official way to see unsent messages and restore them on Messenger, but there are still a few workarounds to see deleted messages. Here are the working methods to see unsent messages on Messenger:
1. Through Notification History

Android users can see the unsent messages on Messenger from their Notification History. Even when a user unsent a message, it stays on your message notification and can be read. But note that to see the unsent message on Messenger, you should have the Messenger Notification and the Notification History feature turned on beforehand. Then only you can read unsent messages using this method.
To turn on the Notification History feature, follow these steps:
Step 1: Unlock your Android phone running on OS 11 or above.
Step 2: Go to the settings app.
Step 3: Select the Notification option.
Step 4: Then select Advance or More Settings.
Step 5: There you will find the Notification History option. You can turn it on from there if it is not turned on. If it is already turned on, you can see all notifications history including the Instagram messages.
Note that this method works only for Android users, as iOS users do not have the Notification History feature.
2. From Message Notification
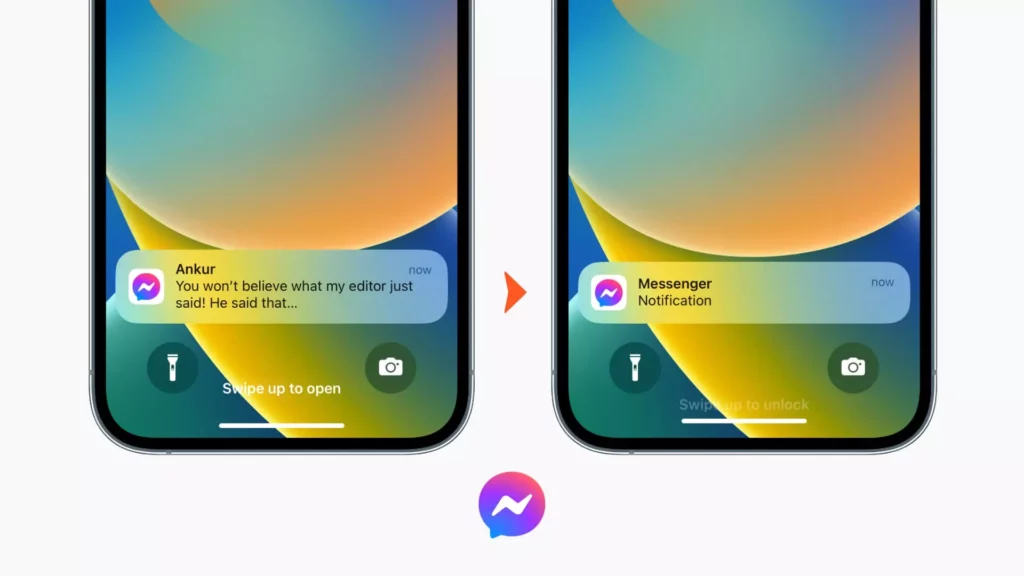
iPhone users can see unsent messages on Messenger through the message notifications on their lock screen. Even when a person unsent a message, it stays in the message notification. To read it, all you have to do is swipe up on your lock screen and look for the message notification. This way, you can read the message even if the users have unsent it, as it still stays on your notification until you swipe it. But note that it only works if you haven’t already opened the message notification to check the message.
3. Through Email Notifications
Email notifications are another way of seeing your unsent messages on Messenger. You can enable email notifications along with push notifications just like you have them on for LinkedIn. If you enable email notification as soon as you receive a message on Messenger, the app will send a notification to your email inbox. In your mailbox, you will get the message sent and the sender’s username. In this way, you can check an unsent message even if the sender later deleted it.
To enable email notifications for messages, follow the given steps.
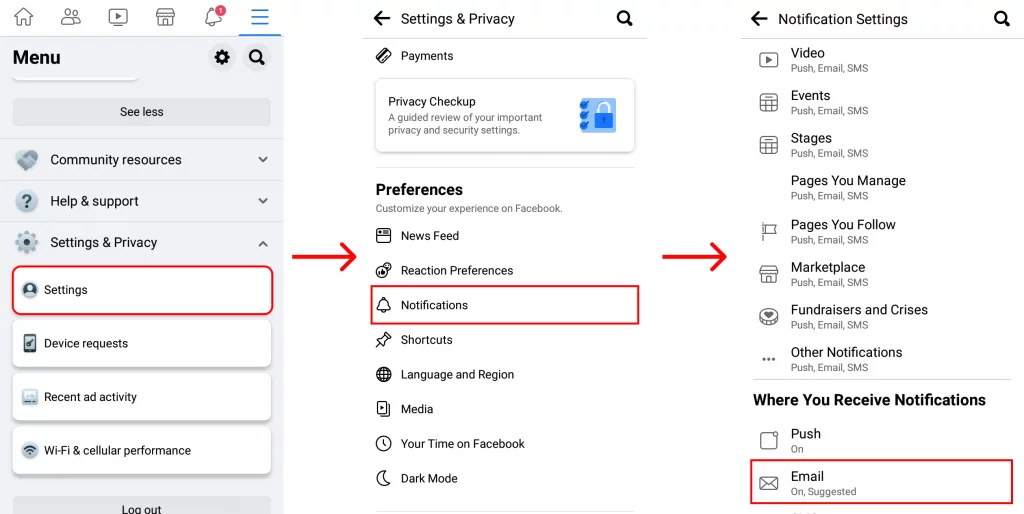
Step 1: Open the Facebook app on your device.
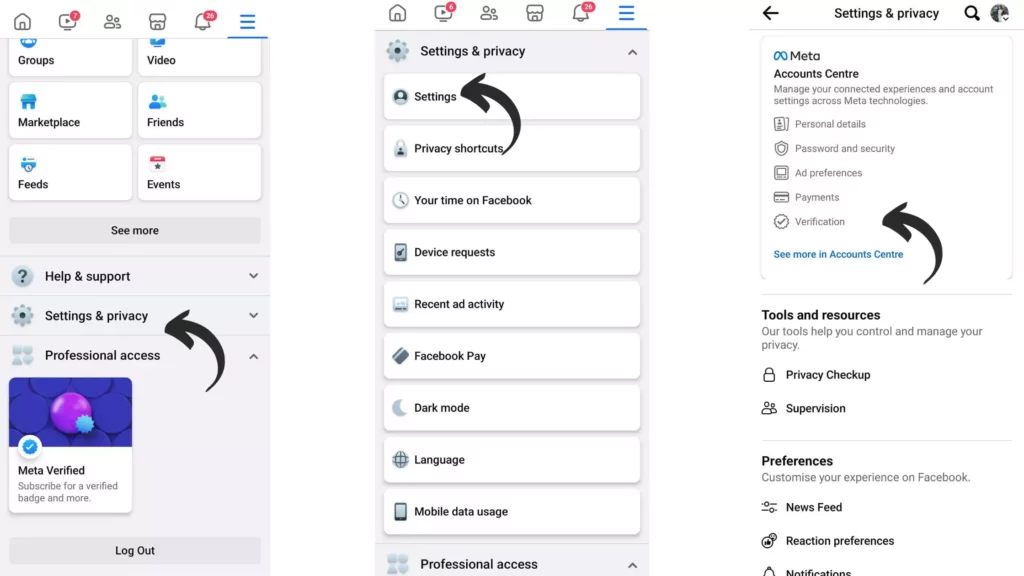
Step 2: Tap on the hamburger icon at the top right.
Step 3: Scroll down to the Setting & Privacy option and tap on it.
Step 4: Select Settings.
Step 5: Select the Notification option.
Step 6: Under Notification Settings, select Messaging.
Step 7: Turn the toggle on next to Email.
And with this, you are done! This is how you can enable email notifications from messages on Facebook.
4. Use Other Third-Party Data Recovery Apps

The other option you have in your hand to see the unsent messages is to use third-party data recovery apps. Many such apps in the Play Store claim to restore deleted chats from social media using the available cache in your device, but using such an app has its own set of concerns.
Therefore, it is advised to research well before using any such app. Also, only try these apps if it is really very important for you to get the deleted message back; otherwise, refrain from using these apps.
Messenger Message Recovery Apps: Recover Unsent Messenger Texts
You can use third-party apps if you are not hesitant to use message recovery apps to recover your unsent, deleted, or removed messages. Here are the top 5 apps that you can use to see unsent Messenger messages:
1. Notisave
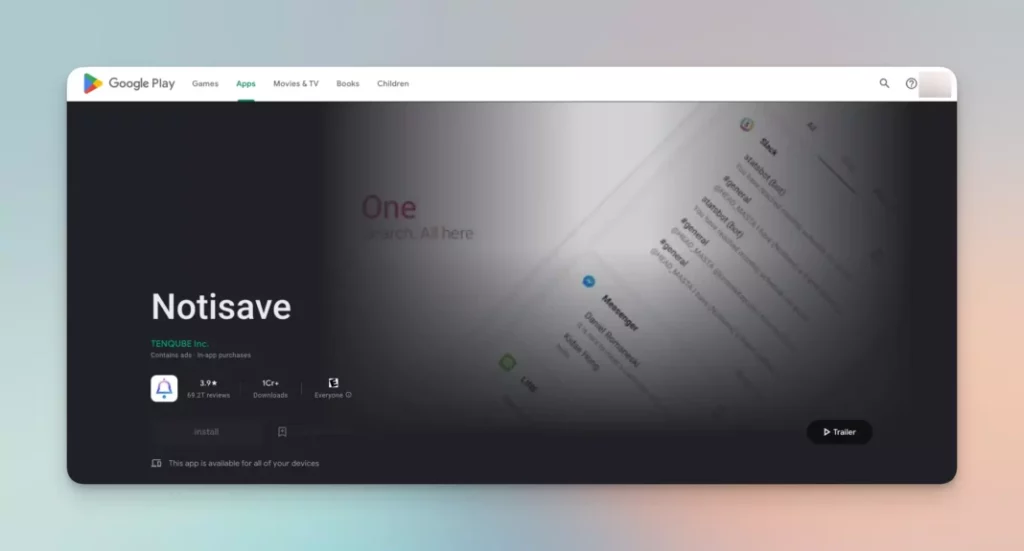
Notisave is your go-to notification saver app for Android devices. The app allows users to save their push notifications from various apps, such as WhatsApp, Facebook, Instagram, and more. You can easily download Notisave from the Google Play Store and can use it to see unsent messages on Messenger.
2. Unseen Messenger

The Unseen Messenger app lets you view all messages and notifications from your phone’s installed apps on one screen. This is a free-to-use app and comes with in-app purchases. You can download this app from the Google Play Store or by clicking here.
3. Filterbox AI Notification Manager
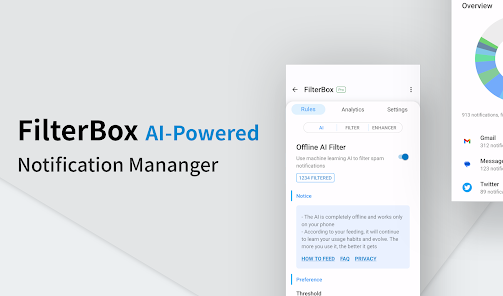
Filter box AI notification manager app is an offline AI-powered notification filtering. The app gives you a complete notification history on your device and is powered by enhanced features. Filterbox AI Notification Manager app is a free-to-use app, and you can easily download the Filter Box AI notification Manager app from here to see unsent Messenger messages.
4. Notification History Log

Notification History Log is your one true destination to manage, sort, and view all past notifications you received. The app will help you generate the notification log and maintain it. To download the Notification History Log app, click here.
Based on their review, I have suggested these apps, but despite the positive reviews, using third-party apps is not completely safe. So be aware of any fraud or scam and be safe.
How to Download Your Facebook Data?
Some users have the misconception that they can find deleted messages in Facebook data, but it is not true. However, if you still want to give this method a try, here is how to download your Facebook data:
Step 1: Open the Facebook app on your Android or iOS device.
Step 2: Tap on the three stacked line icons from the top navigational bar.
Step 3: Scroll down to Settings & Privacy.
Step 4: Select the Settings option.
Step 5: Go to the Account Center.
Step 6: Select Your information and permissions under Account Settings.
Step 7: Select Download your information.
Step 8: Tap on the Request a Download button.
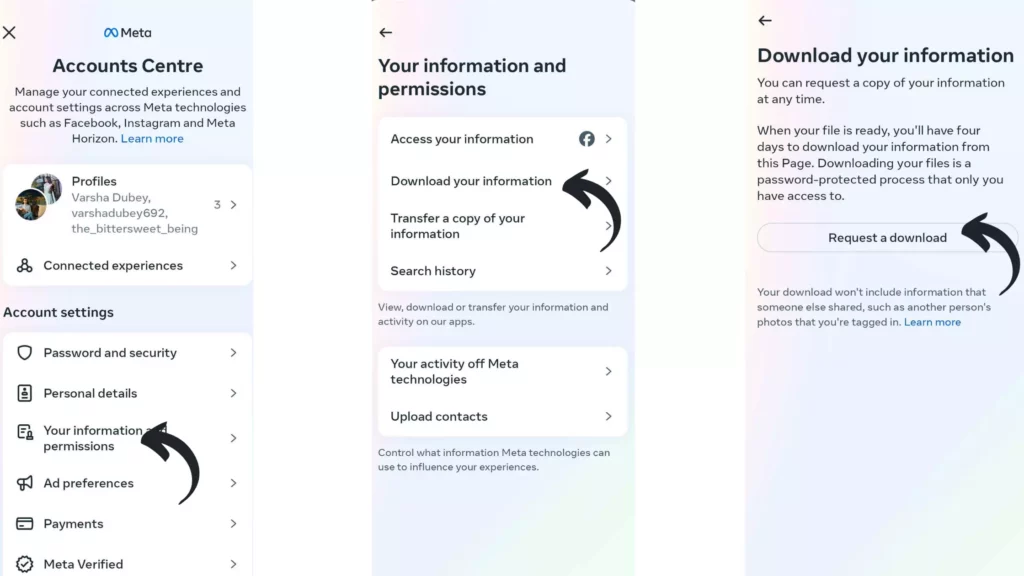
Note: You also have the option to select the type of information you want, in this case, messages.
Step 9: Choose the format and date range.
Step 10: Tap on the Submit Request button.
And that is it. This is how you can download your Facebook data.
How to Unsend Messages on Messenger?
The unsend message feature on Messenger is quite a handy one. You can save yourself from tons of embarrassment using this feature in case you have sent the wrong message to the wrong person. To unsend a message on Messenger, follow the given steps.
Step 1: Open the Messenger app on your phone.
Step 2: Choose the message that you want to unsend.
Step 3: Tap and hold the message you want to unsend.
Step 4: Select the more option.
Step 5: Select Remove.
Step 6: Select Unsend message to remove the message.
Step 7: Tap OK to confirm.

And with this, you are done! This is how you can unsend messages on Messenger.
Can Unsent Messages on Messenger be Reported?
Yes, you can report an unsent message on Messenger if you think the message goes against Facebook Community Standards.
How to Report an Unsent Message on Messenger?
Here is your step-by-step guide on how to report an unsent message on Messenger:
Step 1: Open the Messenger app on your device.
Step 2: Go to the chat you want to report.
Step 3: Press and hold the message next to the unsent message.
Step 4: Select the More option.
Step 5: Select Report.
Step 6: Select a problem to report.
And with this, you are done! This is how you can report an unsent message on Messenger.
But note that you should report the unsent message within 14 days for reviewing from the day the message is unsent.
Wrapping Up
With this, I come to the end of this blog, and I hope you find this article on how to see unsent messages on Messenger informative. So, though there is no direct way to see unsent messages on Messenger, you can always try the workarounds mentioned in the article above to see deleted messages. And yeah, for any further queries related to Messenger and its features, you can comment in the comments section below.
So, guys, that is it for today. Take care! And keep visiting our website, Path of EX, for more queries related to social media, gaming, and technology. Till then, Bye! Bye!
Frequently Asked Questions
1. How Can I Read Unsent Messages on Messenger Without the App?
You can read unsent messages on Messenger without the app by checking your Notification history or by using any third-party tool.
2. How Can I Retrieve Deleted Messages From Messenger?
There is no way to retrieve deleted messages from Messenger.
3. How do I See Unsent Messages on Messenger Using Notisave?
To see unsent messages on Messenger using Notisave, follow these steps:
Step 1: Download and install the Notisave application from the Google Play Store.
Step 2: Open the app and allow notification access to the app.
Step 3: Give the app access to the device’s photos, files, and media.
Step 4: All the app notifications will be loaded on the Notisave app.
Step 5: Enable Autostart.
Step 6: All the notifications on the device are saved, and you can access them when people unsend the messages or delete them.
4. Can Someone See an Unsent Message on an iPhone?
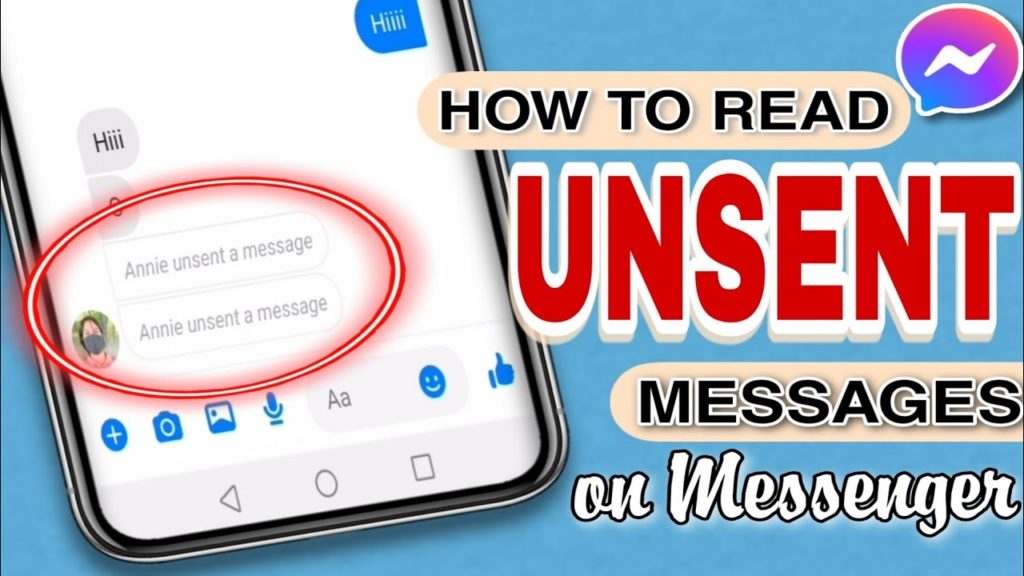
No, one cannot see an unsent message on an iPhone. All they find is a message that reads, ‘user unsent a message.’
5. When You Unsend a Message on Messenger, Does it Notify Them?
When you unsend a message on Messenger, recipients will receive a text alert telling them that something is deleted from the chat.
6. How do I see deleted messages on Messenger?
There is no official way to see deleted messages on Messenger. All you can do is look for them in your notifications if you haven’t already opened them.
7. How do you delete unsent messages on Messenger?
Only the recipient can delete the unsent messages on Messenger, not the sender. If you have unsent a message, it will remove the actual message, leaving behind the message that reads, ‘user unsent a message,’ and this message cannot be deleted from your end. This is to let the person at the receiver end know that you have deleted a message you sent earlier.
To delete the unsent messages on Messenger, follow these steps:
Step 1: Open the Messenger app on your device.
Step 2: Go to the chat you want to delete unsent messages from.
Step 3: Press and hold the unsent message.
Step 4: Select Remove.
Step 5: Tap on the dustbin icon next to the Remove for you.
Step 6: Select Remove again to confirm.