
The feeling that befalls one after having lost an unsaved Word document can be very tragic due to the level of importance of the specific Word document that was lost. Moreover, one could be overwhelmed by the occurrence of such a situation.
As a Mac user wanting to find a solution to recovering an unsaved Word document on Mac – you have just come to the right place. Here, you will know the nitty-gritty that revolves around how to recover unsaved word document mac which will be revealed to you in a jiffy.
Recovering unsaved Word documents on Mac is as simple as it is simply because there are various likely and possible ways how to recover an unsaved word document on mac without any hassle involved. Follow closely throughout this article to gain more insight on how to recover unsaved word documents on mac effortlessly.
In This Article
Part 1: Use Tenorshare 4DDiG to Recover Unsaved Word Document on Mac
Tenorshare 4DDiG is the most recommended data recovery software when it comes to all data recovery-related issues just like it is being used to recover unsaved word documents on Mac. Tenorshare 4DDiG is an all-in-one solution to perform data recovery swiftly.
The general step-by-step guide on how to use Tenorshare 4DDiG to recover unsaved word documents on Mac is explained below:
Step 1:
Firstly, you need to download and install Tenorshare 4DDiG data recovery software on your Mac. Then locate and select where you lost the document to begin data recovery. After that, click the “Scan” button to look up lost documents or files.

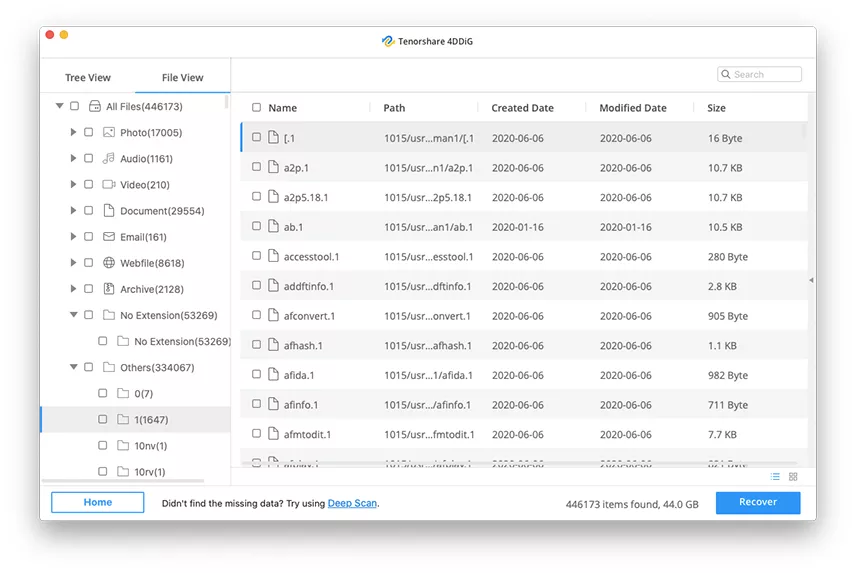
Step 2:
All deleted files will take some time to be scanned, once the scanning process is completed, you can preview the deleted files and select the files you need to recover.
Step 3:
Then select the “Recover” button and choose a location to keep the recovered document or files. Moreover, note that you should not keep the recovered document in the same partition it was being lost to avoid a permanently lost document.

Features of Tenorshare 4DDiG
Talking of a data recovery software, there is no way Tenorshare 4DDiG won’t be mentioned simply because it is a data recovery software that provides the best all forms of data recovery experience. Let’s pinpoint its features below:
- Tenorshare 4DDiG can recover a long-time lost Word document by making use of an advanced algorithm to scan any type of hidden document, thus helping you to get rid of any document loss dilemma.
- Also, It is a powerful data recovery software or tool that is capable of recovering any unsaved Word document on Mac.
Part 2: Recover Unsaved Word Document on Mac Without Data Recovery Software
Nevertheless, you can as well recover unsaved word documents on Mac without the use of data recovery software. This can be achieved by following any of the explained various methods below:
Method 1: Recover Unsaved Word Document from Temporary Files
Unsaved Word documents can be recovered from temporary files because the Word for Mac saves a copy of any unsaved document called Word Work File in the Temporary file folder located on your Mac.
The step-by-step guide on how to recover an unsaved word document on mac from Temporary Files is explained below:
Step 1:
Firstly, open “Terminal”.
Step 2:
Secondly, the next step after you have opened “Terminal” is to type cd $TMPDIR.
Step 3:
Also, type or input ls to showcase the files. Then locate your document in the TemporaryItems subfolder.
Step 4:
Finally, search for the initially lost file then “Save As” to save it in a different storage location.

Method 2: Recover Unsaved Word Document from AutoRecover
The AutoRecovery option on Word for Mac is turned on by default which enables an automatic save of an open Word file every 10 minutes. You can recover any form of lost unsaved Word document through the AutoRecovery method.
Step-by-step guide on how to recover unsaved word document mac with auto-recovery:
Step 1:
On your Mac, open a “Finder” window.
Step 2:
The next step is to select the whole computer as the location.
Then enter ‘AutoRecovery’ in the Search field. You will see the listed files. It starts with ‘AutoRecovery save of’ which is followed by the Word document name you want to recover.

Step 3:
Double-click the file to make the document open in Microsoft Word for Mac.
Step 4:
Click on the File menu and pick “Save As”. Rename the file, then select a folder for the file and click the “Save” button.

Note that the above steps would enable you to recover Word documents on a Mac if the AutoRecovery option is turned on.
Method 3: Recover Deleted Word Documents from Trash
Any deleted word document can also be recovered from Trash. A file that was deleted in its folder won’t be found in that location. Moreover, it is not deleted from your Mac unless the Trash is emptied. Follow the step-by-step procedure below to know how to recover unsaved word documents on mac which is found in the Trash:
Step 1:
Firstly, open the Trash folder by double-clicking on its icon which is located on Mac’s screen.

Step 2:
Then right-click on the file name and choose “Put Back” to return the file to its initial location.

Method 4: Restore Word Document from Word Files’ Previous Version
The steps below should be followed to restore the Word document from Word Files’ previous version.
Step 1:
Launch the most recent version of the Word file to be recovered.
Step 2:
Locate and open File in Microsoft Word, then click Browse Version History.

Step 3:
A panel will be displayed showing the previously saved versions of the file.
Step 4:
Choose the previous version you want to recover, then select Restore to finalize the process.

Method 5: Recover Unsaved Word Document on Mac from Recovered Item
There is a folder named “Recovered items” where documents that a user has not yet saved are being temporarily saved into. The “Recovered items” folder is being located in the Trash and if there are no recovered files, then this folder won’t appear.
However, the steps below explain how to recover unsaved word document mac easily.
Step 1:
Open the Trash icon located on the dock.
Step 2:
Then look for a folder named “Recovered items” and open it to locate your unsaved Word file.
Part 3: How to Avoid Losing Your Word Documents?
Knowing fully well how it feels to lose your Word documents, then you will agree that you don’t want to ever experience such a situation again. Thereby, you need to know how to avoid losing your Word documents. The tips below will help:
Tip 1. Save the new word document you have just created immediately
Since an unsaved Word document is present in the computer’s RAM and not on the hard disk, then there is a lower chance of saving a Word document that has never been saved before which should make you ensure that a save is being done at least once when a new document is being created.
Tip 2. Change the AutoSave Interval
The AutoSave feature begins to work after your Word document is saved. Thus, to reduce the loss of saving progress on the file which you are working on, then you are opportune to change the AutoSave interval.
The steps below explain how to change the AutoSave interval:
Step 1:
Firstly, launch Microsoft Word on your Mac.
Step 2:
Then go to “Word” and locate “Preferences”. Click “Save” under Output and Sharing.
Step 3:
It is recommended that you change all the items under Save Options, then change the AutoSave interval to a time frame of your choice.
Conclusion:
There you have it! Having known the most likely ways on how to recover unsaved word documents mac. Then it is to your advantage to make use of the most recommended data recovery software known as Tenorshare 4DDiG to recover an unsaved word document on Mac.