Facebook encompasses all the generations to stay connected with each other. With each year passing, Facebook introduces new updates to increase the experience of using the application. From providing a safer shopping experience to expanding social media connections, everything enhanced our experience. One of the amazing updates of Facebook to grow a large community on Facebook is creating Facebook Groups. For this, you must know how to manage Facebook Groups.
We all are added to different groups on different social media platforms like WhatsApp, Messenger, Instagram, Snapchat, and Facebook. Although the pandemic disrupted our communication physically, thanks to social media, we regained our relationship and are better connected with like-minded people. Likewise, businesses can also use Facebook groups to boost engagement.
To create smooth interaction with the Facebook community, go through the article. I know you are excited to use these features that help you to increase your reach on Facebook. Learn how to manage Facebook groups now.
In This Article
6 Best Tips On How To Manage Facebook Groups
Creating a Facebook group is easy but managing a Facebook Group needs some right strategies to build a large community. Are you an admin of the Facebook page and have a goal to increase the reach? Worry not! Here, I will give you the best tips that help you know how to manage Facebook Groups. Let’s get started with these tips below-
1. Set The Notifications
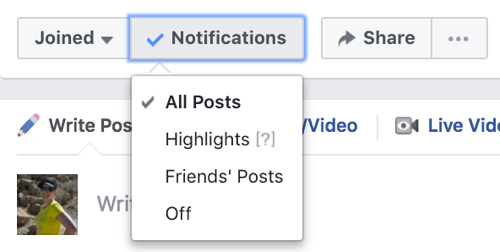
To manage Facebook groups effectively, you must know how to use the notifications option to update the Facebook group. You receive notifications regarding All Posts, Highlights, Friend Posts, and Member Requests.
Notifications help you keep an eye on the activities of the group members. For this, you must keep your notification on. It is exactly right below the cover photo of the Facebook group.
- To know who has commented on the specific posts, turn on the notification for a specific post. For this, tap on the downward arrow and turn on the notification.
- To know about who has joined your Facebook Group, follow the few steps-
- Tap on three dots that are exactly below the cover image.
- Click on Manage Group.
- Click on Get notification when people ask to join.
2. Create Engaging Questions For Members

If you want to engage your audience on the Facebook Group, create engaging questions for group members. You can frame a questionnaire when they send you a request to join the group. For this, follow a few steps that help you to learn how to manage Facebook Groups effectively.
- Tap on three dots that are exactly below the cover image.
- Click on Manage Group.
- Click on Member Request.
- Click on the Settings icon.
- Under Ask Pending Members Questions, click on Add a question.
- Finally, tap on the Save icon.
3. Approve Pending Requests to Increase Reach
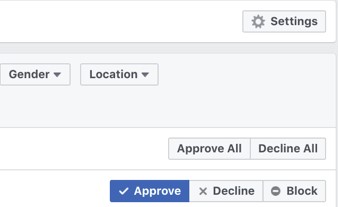
To increase the reach on Facebook, you must approve the pending requests to grow your community on Facebook. To add authentic members to your Facebook group, you can view their bio, mutual friends, or whether they have filled the questions that are mandatory to fill when then they join the group.
Once you have checked all the details, click on the Approve icon. You can also decline or block the request of the members, and you can also approve or decline all the requests at one time. For this, click on either Approve All or Decline All.
4. Remove Unauthentic Members from the Group
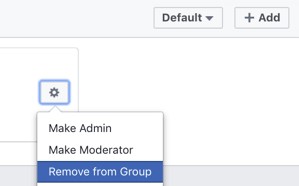
If you want to enjoy a safer experience on the Facebook group, you can remove unauthentic members from the group. For this, follow the few steps-
- Go to the left side of the Facebook Group.
- Tap on the Members.
- Click on the Settings icon.
- You will see three options: Make Admin, Make Moderator, and Remove from Group.
- Click on Remove from Group.
- The next page will appear on the screen.
- Tick the boxes to remove comments, posts, or invitations from that member.
- Tick the box of Block Member
- Finally, click on Confirm.
You can also remove the reported accounts. To see the reported accounts, follow the few steps.
- Tap on three dots that are exactly below the cover image.
- Click on Manage Group.
- Navigate through the options and click on Reported to Admin.
- You can remove this member after discussing it with members of the group.
5. Make Your Group Attractive
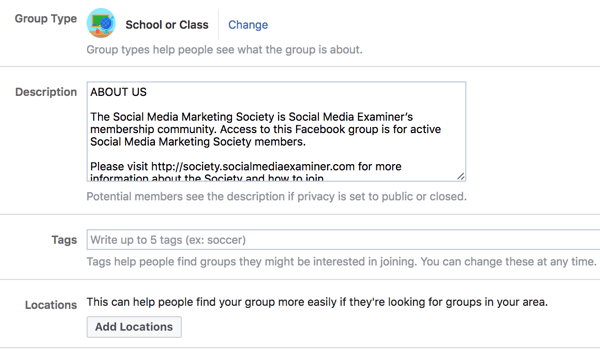
If you want to increase the reach of your Facebook Group, make your group attractive. For this, you have framed a goal to build a large Facebook community. Make sure you add the following points-
- Brief Description.
- Add five tags to help people find your group they might be interested in joining.
- Add Location to help people find your group more easily if they are looking for groups in your area.
- Add a Group Type like Buy and Sell, School or Class, Travel, Study Group, and many more. It helps people know what type of posts you will be sharing on your Facebook Group.
6. Schedule Facebook Group Posts
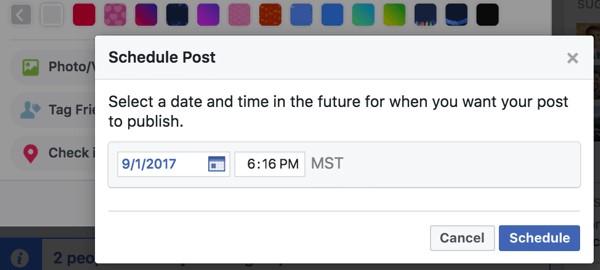
To manage your Facebook Groups effectively, you can set the scheduled date and time for your posts. You have to consider the timing of the Facebook group members and post the content at the right time. For this, follow the few steps-
- Open the Write Post page.
- Update your Post and click on the Schedule icon.
- Set a Scheduled date and time.
- Finally, tap on Schedule.
You can also use various schedule tools to schedule your Facebook posts. For this, you can use Hootsuite, Later Scheduler, Buffer, or any other tool.
Wrapping Up
So this was all about how to manage Facebook Groups to increase the audience reach for your posts. You can build a large Facebook community and let them consume your content to boost engagement. Now, it is time for a wrap-up. Feel free to share the article with your friends. Stay tuned for all the exciting updates.