Has your boss asked you to fax a document? Don’t panic! There is no need to search for fax machines all over the internet. You can use your iPhone to send and receive fax. Yes! That’s possible and very easy. I don’t understand why some companies still use fax. There are so many better technological ways to send and receive documents. However, since you have no other option, let me help you with this easy guide on how to fax with iPhone.
Over the years, Apple has gathered a very loyal user base. It can be credited to the new features it keeps launching. Keeping the features aside, Apple frequently updates its software to make the performance of its devices top-notch. Recently, Apple introduced features like Share Focus Status and several new emojis. Now that iOS 16 is in the news, there are many more expectations.
Apple has not launched any in-built fax app for iPhones. Who knows, someday it might! Until that day, let us have a look at how to fax with iPhone using different applications.
In This Article
How to Fax with iPhone Using iFax App?
iFax is the original fax app for iOS. This app was launched way back in 2008. It revolutionized the way people experienced faxing. Imagine a year when apps were not the mainstream norm, and Apple comes up with a Fax app. Well, that was cool! iFax has stayed on the top of the fax apps since its release. Anyone who has to fax a document can blindly rely on this app.
Here is how to fax with iPhone using iFax app:
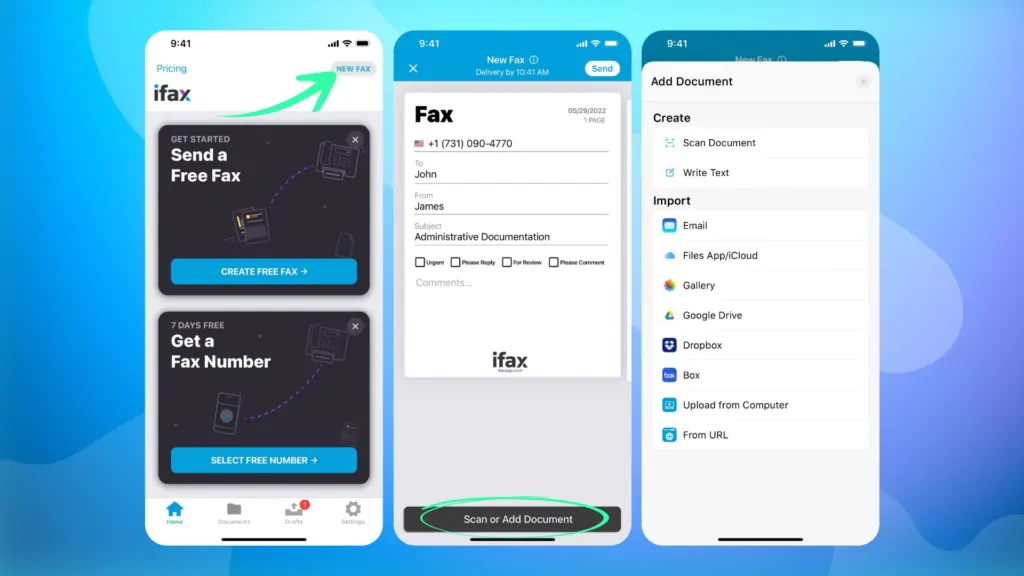
- Go to the iFax app.
- Register to make an account.
- Tap on Send Fax option.
- Type the recipient’s name and fax number.
- Click on Add File.
- Select the document you want to attach.
- Click on Send.
How to Fax with iPhone Using eFax App?
Another great app to fax from iPhone is eFax. This app is considered one of the best apps to send and receive faxes. It even gives the users the option to fax from their website. This app has millions of users worldwide. eFax lets the users maintain a fax contact list. This app also allows accessing faxes on your iPhone.
Here is how to fax with iPhone using the eFax app:
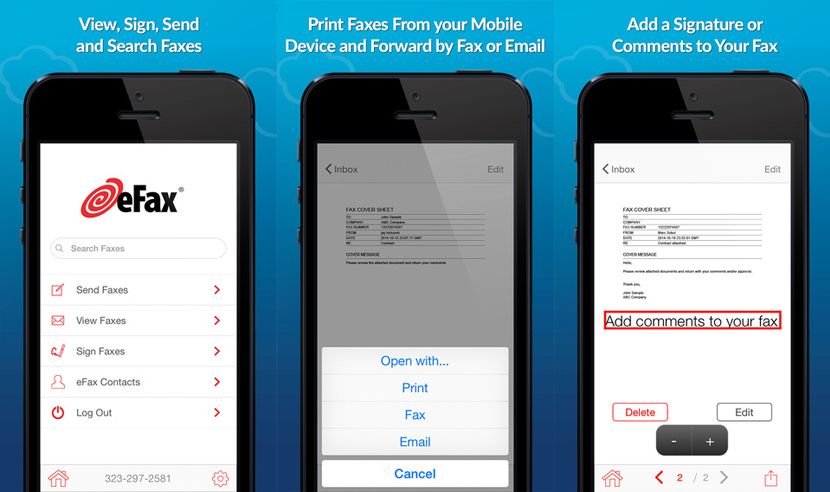
- Go to the eFax app.
- Click on the Send Faxes option.
- Type the recipient’s fax number.
- Select the document.
- Tap on the Send Button.
How to Fax with iPhone Using Fax.Plus App?
Fax.Plus is one of the best online fax services. It lets its users send and receive fax on iOS. You only need this app and a fax number to send a fax. There is no other requirement. It even lets the users attach documents from iCloud Drive or their phone’s storage. Fax.Plus is a safe app because it stores all your received faxes in an encrypted format.
Here is how to fax with iPhone using Fax.Plus app:
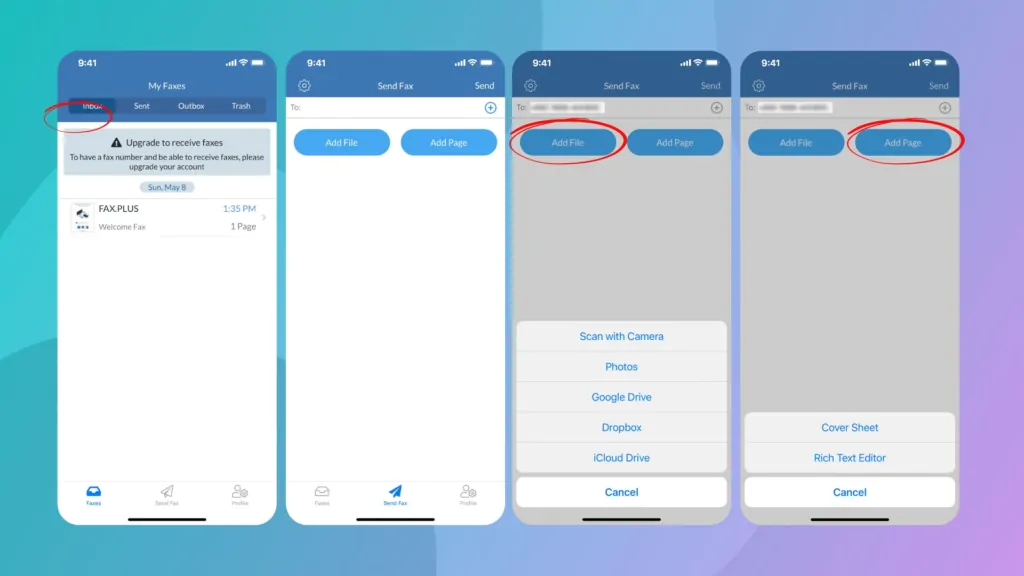
- Go to Fax.Plus app.
- Click on Send Fax Option.
- Type the recipient’s fax number in the ‘To’ field.
- Now, tap on Add File.
- Select the document you want to fax.
- Tap on the Send Button.
Why is Fax Still Used?
It’s 2023, and we are still using fax. While there are many ways to send and receive documents, many organizations still prefer fax. It is quick and convenient. Fax is considered a secure way to send important documents. It is a safe way to transmit documents with important information and your signature. An added advantage of using fax is that you get a receipt of confirmation when you fax someone. So, you won’t have to worry about whether they have received it.
Wrapping Up
It is time to wrap up! In this article, I have told you how to fax with iPhone. There is no built-in fax feature in any iPhone. However, there are a lot of third-party apps that you can use to fax. These apps are easy to use. Some of these apps are free, while some are paid. All you require is to download the app and get a fax number. With these two things, you can easily fax any document to anyone.
I hope you found this article useful. For more such content, keep visiting Path of EX!