Are you ready to host an event but don’t know where to start? Look no further! You have stumbled upon the ultimate guide on how to create an event on Facebook. Whether you’re planning a virtual event, a birthday party, or a networking event, creating an event on Facebook is a great way to get the word out and make it easy for your guests to RSVP.
With the world shifting towards virtual events, hosting one on Facebook has never been easier. Not only is it convenient for your guests, as they can RSVP, ask questions and even watch the event from the comfort of their own homes, but it also opens up a whole new world of possibilities for promoting and organizing your event. Facebook Events allows you to create a personalized event on Facebook business pages, other pages, and profiles. It also lets you invite your friends and boost the event to reach a larger audience. It’s a great way to keep your guests informed and up-to-date with the event details.
Trust me; you’re in the right place. Keep reading, and you’ll discover just how to create an event on Facebook and how easy it is. I promise you’re going to love the tips and tricks I have in store for you. And don’t worry; I’ve got you covered with a sprinkle of humor to keep things interesting. So, let’s get started!
In This Article
How to Create an Event on Facebook?
Create an event on Facebook, make it unique, invite your friends, and even enhance the event to reach a bigger audience using Facebook events. It’s an excellent method to keep visitors informed and up to speed on event specifics. However, there are different ways to create an event on Facebook. Whether you’re establishing an event from your personal profile or a Facebook page, there are a few crucial steps to take to ensure that your event is properly set up. Let’s look at them one by one.
How to Create an Event on Facebook Profile?
Follow these steps to create an event on Facebook:
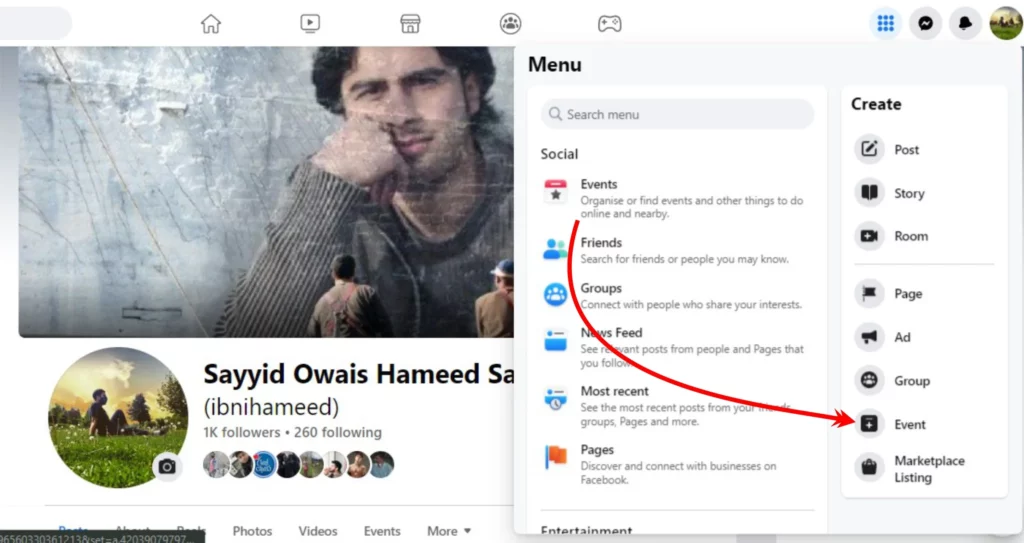
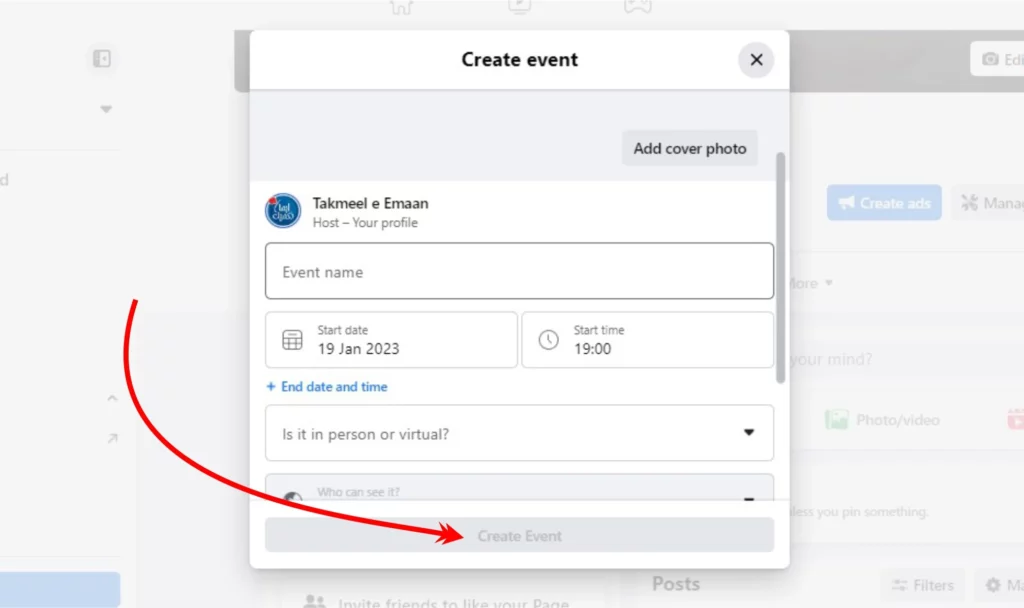
Step 01: From your Facebook homepage, click Events in the left menu. If you don’t see it, click See more.
Step 02: Click Event.
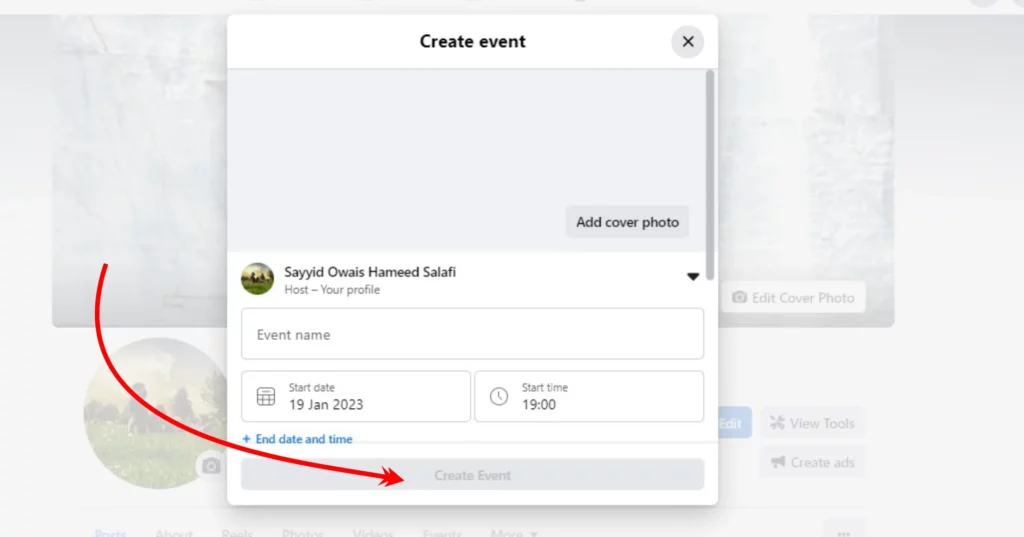
Step 03: Add the event name and date, and time.
Step 04: Choose whether you want to keep it in-person or Virtual. In virtual, you can select Facebook Live and External Links.
Step 05: Add location.
Step 06: Click Privacy and select one of the options (Private, Public, Friends, Group).
Step 07: Add a description of the event, and fill in the different forms available on the event creation page.
Step 08: Click Upload Cover Photo or Choose Illustration if you want to add a cover photo.
Step 09: Click Event settings if you want to add a co-host or make other adjustments.
Step 10: Click Create Event to finalize the event creation.
How to Create an Event on Facebook Pages?
Remember, when you create an event on Facebook Pages, that event is public by default and cannot be restricted. It is similar to the above section to create an Event on Facebook pages. Here is how:
How to Create an Event on Facebook on Classic Page?
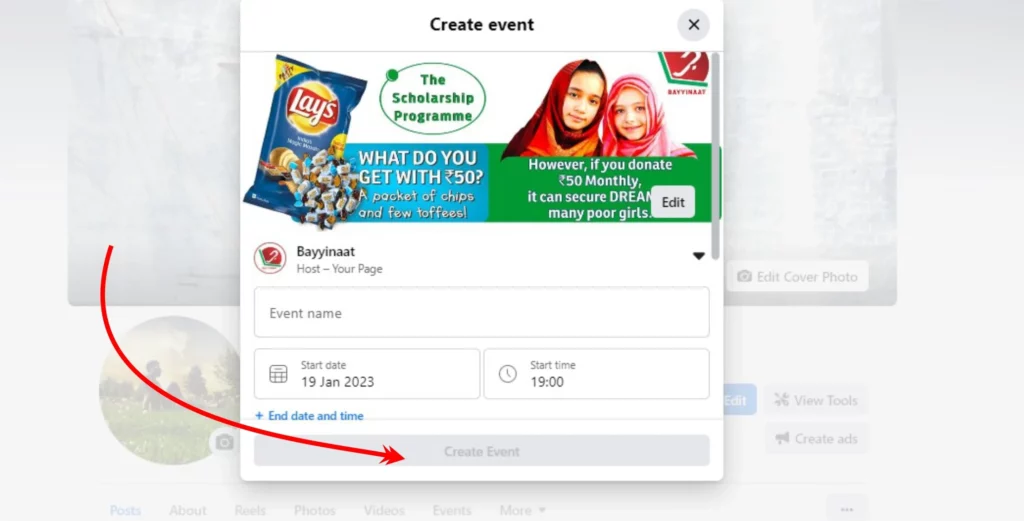
Step 01: Go to the page you want to create an event with.
Step 02: Select Events.
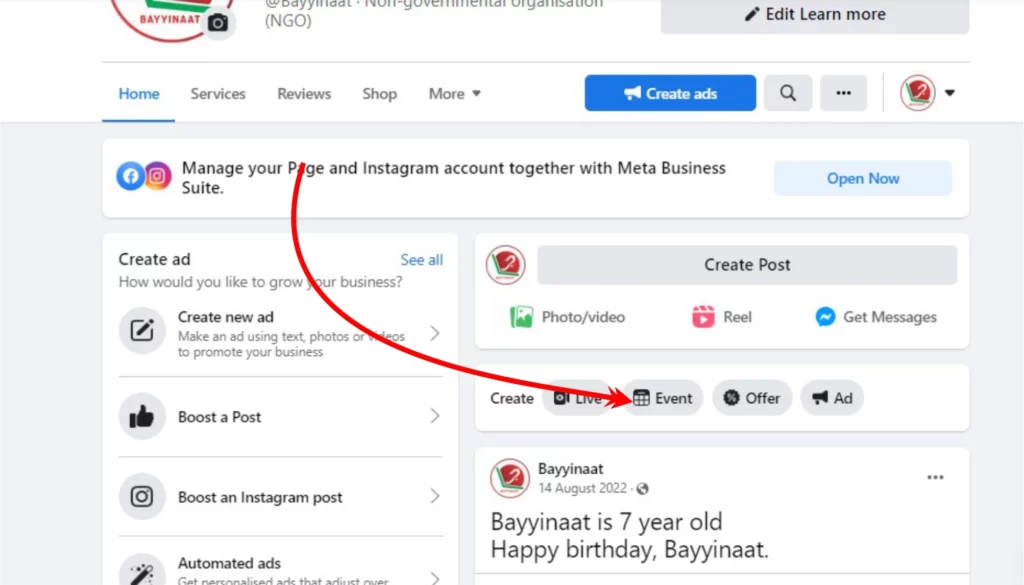
Step 03: Select the option CREATE EVENT.
Step 04: Add the event name and date, and time.
Step 05: Choose whether you want to keep it in-person or Virtual. In virtual, you can select Facebook Live and External Links.
Step 06: Add location.
Step 07: Click Privacy and select one of the options (Private, Public, Friends, Group).
Step 08: Add a description of the event, and fill in the different forms available on the event creation page.
Step 09: Click Upload Cover Photo or Choose Illustration if you want to add a cover photo.
Step 10: Click Event settings if you want to add a co-host or make any other adjustments.
Step 11: Click Create Event to finalize the event creation.
How to Create an Event on Facebook on New Page Experience?
Step 01: Switch to the page you want to create an event with.
Step 02: From your Facebook homepage, click Events in the left menu. If you don’t see it, click See more.
Step 03: Click Event.
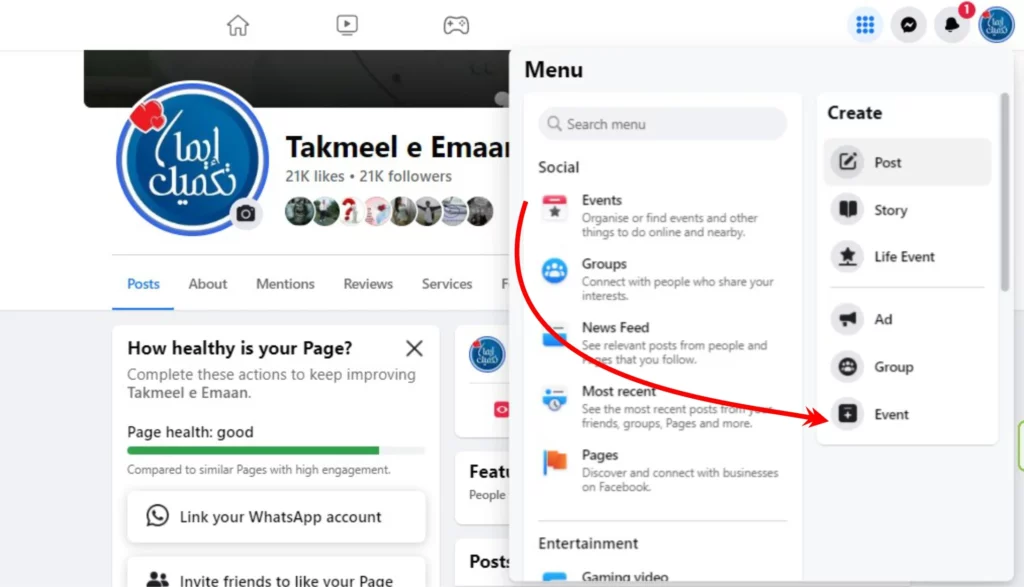
Step 04: Add the event name and date, and time.
Step 05: Choose whether you want to keep it in-person or Virtual. In virtual, you can select Facebook Live and External Links.
Step 06: Add location.
Step 07: Click Privacy and select one of the options (Private, Public, Friends, Group).
Step 08: Add a description of the event, and fill in the different forms available on the event creation page.
Step 09: Click Upload Cover Photo or Choose Illustration if you want to add a cover photo.
Step 10: Click Event settings if you want to add a co-host or make any other adjustments.
Step 11: Click Create Event to finalize the event creation.
Understanding Event Privacy on Facebook

When creating an event on Facebook, one of the first things you’ll need to decide is the privacy setting for your event. Facebook offers several options for event privacy, each with its own set of benefits and limitations.
Private: Guests must be requested to the event, and the event is hidden. You can also choose to allow guests to invite their friends by clicking the toggle next to “Guests can invite friends.” Bear in mind that you can’t change the privacy setting after you’ve created the event.
Public: Anyone can notice and enter the event. This option is useful if you want to reach a wide audience and get as many people to attend your event as possible.
Friends: Only your Facebook buddies can see and join the event. This option is useful if you want to keep the event exclusive to your friends and don’t want to open it up to the public.
Group: Who can notice and attend the event depends on the group’s privacy. If the group is public, anyone can see and join the event. If the group is private, only members of the Facebook group can see and join the event. This option is useful if you want to host an event within a specific community or group of people.
It’s important to consider the purpose of your event and who you want to invite when choosing the privacy setting. Keep in mind that once you have created an event, you can’t change the privacy setting later.
How to Customize Event Settings on Facebook?

When creating an event on Facebook, you can customize the settings to suit your needs by clicking on “Event settings” on the last step before creating your event. The options available will depend on the privacy setting for the event.
Private and Friends
- Co-hosts: You can add co-hosts to your event to help manage and promote the event.
- Show guest list: You can choose to show the guest list to everyone, only the host, or keep it hidden.
Public
- Co-hosts: You can add co-hosts to your event to help manage and promote the event.
- Show guest list: You can choose to show the guest list to everyone, only the host, or keep it hidden.
- Only hosts can post: You can choose to allow only the hosts and co-hosts to post on the event page.
- Posts must be approved by the host: You can choose to approve or reject posts before they are shown on the event page.
Group
- Co-hosts: You can add co-hosts to your event to help manage and promote the event.
It’s important to consider the purpose of your event and the type of audience you are targeting when choosing the event settings. Customizing event settings can help you to control the flow of conversation and manage the event more effectively.
How to Promote Your Event on Facebook?
Once you’ve created your event on Facebook, it’s important to start promoting it to your target audience. There are a few ways to promote your event on Facebook, such as boosting the event or creating a Facebook event ad. Boosting the event allows you to reach a larger audience by promoting it to people who are likely to be interested in your event. Facebook event ads allow you to create a sponsored ad that promotes your event to a specific audience. When creating your ad, be sure to include a clear call-to-action, such as “RSVP now” or “Join the event.”
Another important aspect of promoting your event is to engage with your guests before and during the event. This can be done by responding to their questions and comments on the event page or by creating a dedicated discussion thread for the event. Additionally, you can also use other social media platforms to promote your event and reach a wider audience.
Promoting your event on Facebook is crucial for the success of your event. By following these steps and tips, you’ll be able to reach your target audience, increase attendance, and create a memorable experience for your guests.
How to Manage and Engage Guests During a Virtual Event on Facebook?

Managing and engaging guests during a virtual event on Facebook is crucial for creating a memorable experience. During the event, you can use the chat feature to respond to guests’ questions and comments in real time. Additionally, you can also use polls and quizzes to keep your guests engaged and encourage participation.
Another important aspect of managing guests is to keep them informed and up-to-date with the event details. This can be done by sending out reminders and updates or by creating a dedicated discussion thread for the event. Additionally, you can also use event analytics to track the performance of your event and make data-driven decisions.
Hence, managing and engaging guests during a virtual event on Facebook is crucial for the success of your event. By following these steps and tips, you’ll be able to create a memorable experience for your guests and make your event a success.
Wrapping Up
I hope this guide has provided a comprehensive overview of how to create an event on Facebook. From setting up the event to managing and promoting it, we have covered all the important aspects. We have delved into different options for event privacy and tips for promoting and engaging guests. With the right tools and strategies, you can create a successful and memorable event on Facebook.
Be sure to share this article with your co-hosts and other event organizers, as it serves as a valuable resource for anyone planning an event on Facebook. Remember to bookmark Path of EX for more Facebook guides and tips in the future.
