
Are you tired of your old Facebook name? Do you want to rebrand yourself and start fresh on the social media platform? If so, you’ve come to the right place. In this blog, I will show you how to change your name on Facebook.
Names have always been an important aspect of our identity. They are often the first thing that people notice about us, and they can carry a lot of meaning. On Facebook, your name is front and center on your profile and in all of your interactions with others. It’s essential to have a name that represents you accurately and makes you feel good. You don’t need to delete your current Facebook account if you want to change it. You can do it anytime.
As you’re reading this, you might be wondering how to change your name on Facebook, and if it’s even possible. Yes, it’s possible, and I will guide you through the process. Keep reading to find out how you can change name on Facebook in just a few simple steps.
In This Article
How to Change Your Name on Facebook: Rename and Refresh
Now that you understand the importance of having the correct name on Facebook, it’s time to dive into the nitty-gritty of how to change your Facebook name. The process may seem daunting, but it’s actually quite simple. There are different methods to change name on Facebook, whether you’re using an iOS or Android mobile device, or a PC. In the following sections, we will discuss each method one by one, providing clear and detailed instructions on how to change your Facebook name. So, let’s get started!
How to Change Your Name on Facebook on iPhone? A Step-by-Step Guide
Are you looking to change your name on Facebook on your iPhone or iPad? Follow these simple steps to update your name in no time.
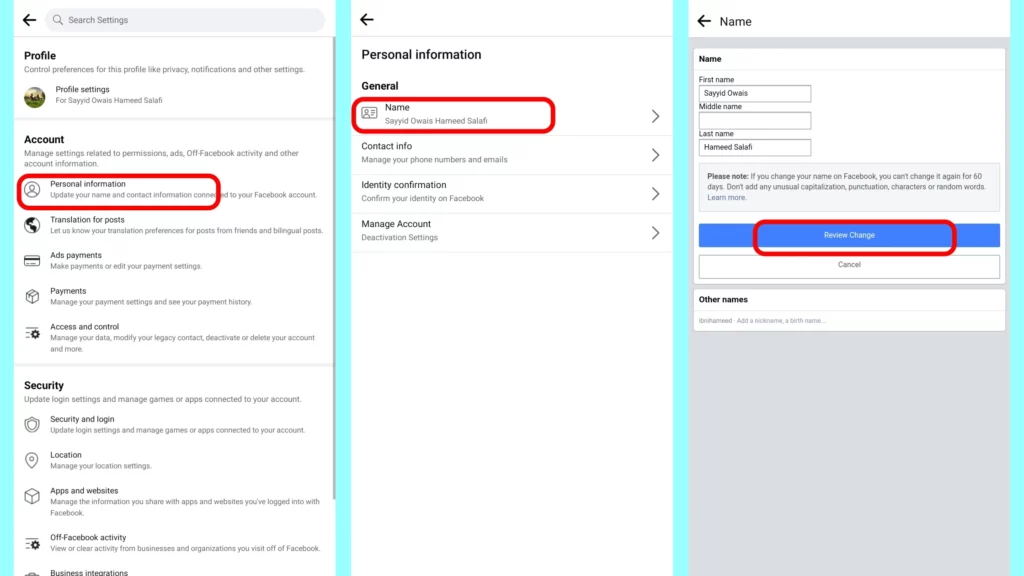
Step 01: In the bottom right of Facebook, tap the hamburger menu icon.
Step 02: Tap Settings and privacy, then tap Settings.
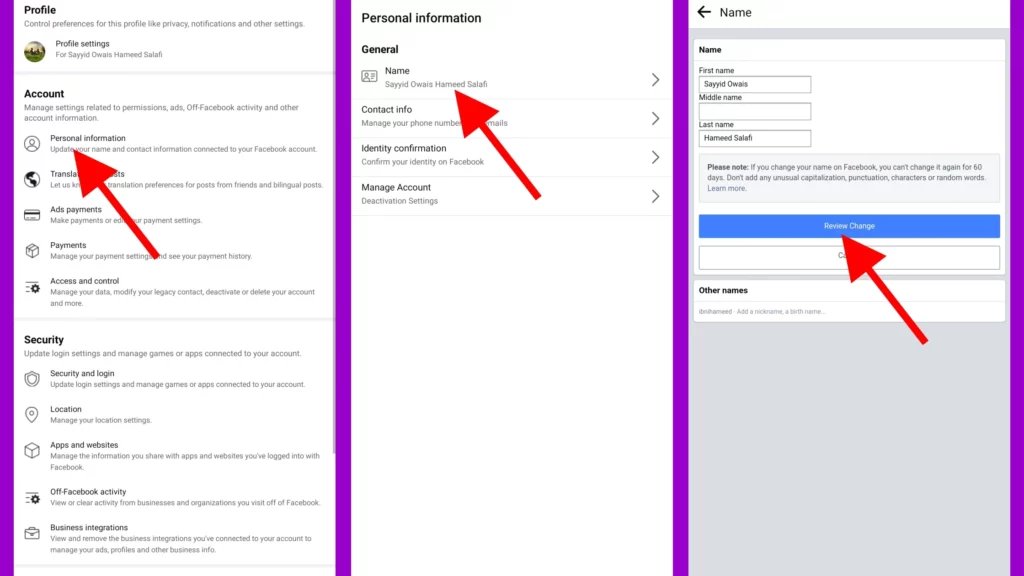
Step 03: Tap Personal and Account Information.
Step 04: Tap Name.
Step 05: Type your preferred name and tap Review Change.
Step 06: Enter your password and tap the Save Changes button to finalize the task.
How to Your Name on Facebook on an Android?
Do you want to change your Facebook name on your Android device? The process of changing your Facebook name on an Android phone is very similar to that of an iOS device. The only difference is the location of the menu button, which is located in the top right of the Facebook app on Android devices. Follow these easy steps to quickly alter your name.
Step 01: Tap the hamburger menu icon in the top right of Facebook.
Step 02: Scroll down and tap the Settings and privacy option, then tap the Settings option.
Step 03: Tap the Personal and account information option.
Step 04: Tap the Name button.
Step 05: Type your new name and tap the Review Change button.
Step 06: Type your password and tap the Save Changes button.
And that’s it! Your Facebook name has now been updated on your Android Phone.
Change Your Name on Facebook on a Computer: A Step-by-Step Guide
The process of changing your Facebook name on a computer is very similar to that of mobile devices. The only difference is the location of the menu button, which is located in the top right of the Facebook page on a computer. Follow these simple steps to change your name on Facebook in no time.
Step 01: In the top right of Facebook, click your profile picture.
Step 02: Click the Settings and privacy option, then tap the Settings option.
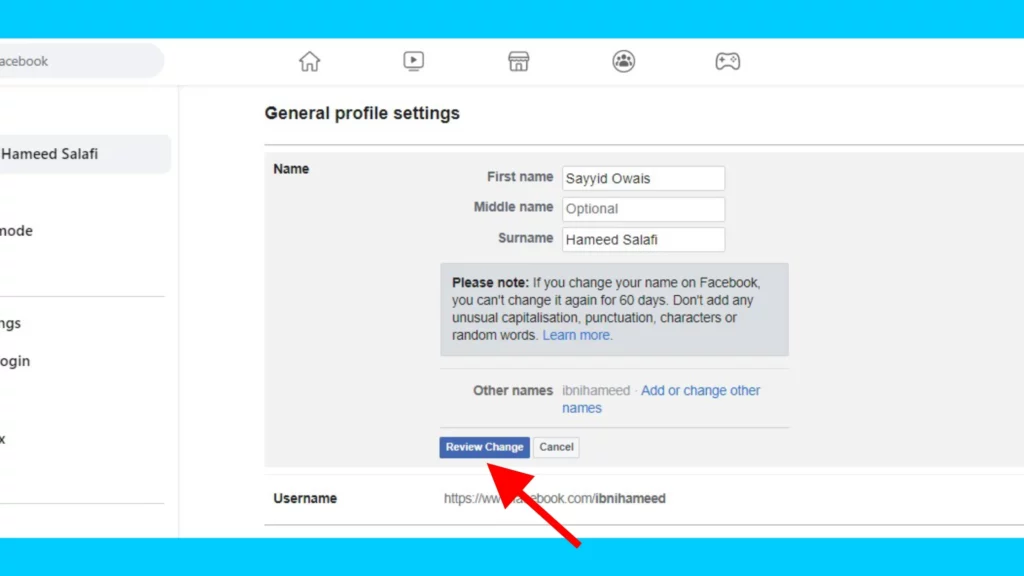
Step 03: Click the Name button.
Step 05: Type your new name and click the Review Change button.
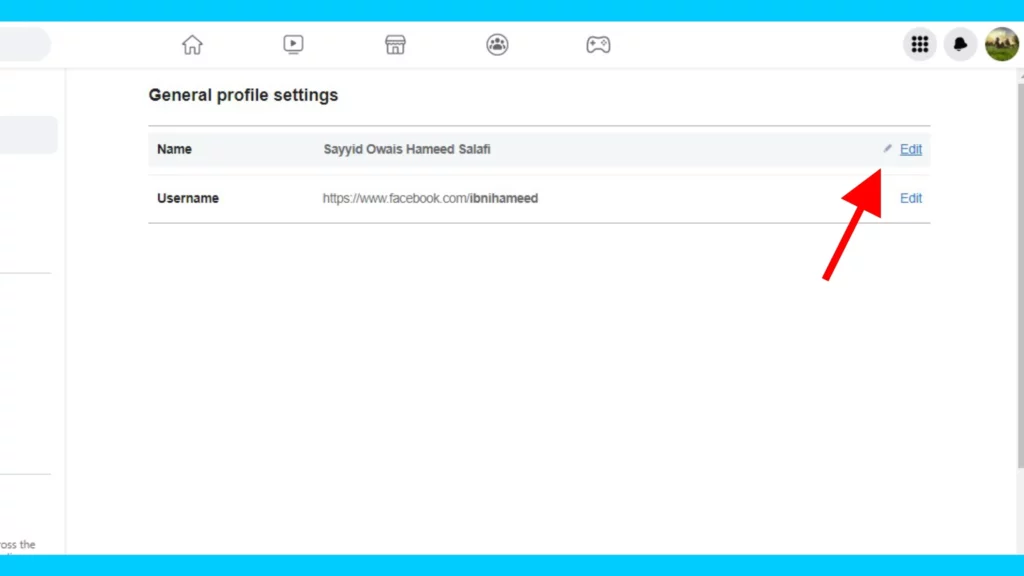
Step 06: Type your password and click the Save Changes button.
How to Change Your Name on Facebook on a Smartphone Web Browser?
Changing your Facebook name on a smartphone web browser is quite similar to changing your Facebook name on a computer or mobile device. On a mobile browser, the only change is the URL.
Step 01: Open your mobile browser and navigate to the Facebook mobile website.
Step 02: Locate the hamburger button on the top right corner of the Facebook page and tap on it.
Step 03: Scroll down and select the Settings option, then tap on Personal and account information.
Step 04: Tap on the Name option.
Step 05: Enter your new name and tap on Review Change.
Step 06: Verify your change by entering your Facebook account password, then tap on Save Changes.

Want to Change Your Name on Facebook? Standards and Guidelines to Keep in Mind
Facebook is a community where individuals use their real names, making it simple to identify who you’re connected with. When it comes to altering your name on Facebook, though, there are several restrictions and criteria that must be observed.
Unacceptable Name Changes

- Symbols, digits, uncommon capitalization, reprising characters, or punctuation marks are not allowed.
- Characters from numerous languages are not allowed.
- Titles of any kind (Dr. Mr. Br.) are not allowed.
- Words or idioms may not be used in lieu of a name.
- Any offensive or provocative language is prohibited.
If you are still unable to change your name after following these guidelines, you may want to contact Facebook support for assistance.
Things to Remember

- The name on your profile should be the name that your friends call you in everyday life, and it should also be on a form of ID or document from Facebook’s ID list.
- If your nickname is a version of your given name, it might be used as a first or middle name.
- You can also add a different name to your account (e.g maiden name, nickname, professional name).
- Profiles are solely for personal use. You may make a Page for a company, organization, or concept.
- Pretending to be someone or something else is not permitted.
By following these standards and guidelines, you can ensure a smooth process when changing your name on Facebook. Remember to double-check your name change before submitting it, as it can only be changed again after 60 days of the previous change.
Wrapping Up
I hope this article “How to Change Your Name on Facebook” has helped you understand the process and guidelines to help you change your name on Facebook. Remember to follow the standards set by Facebook and double-check your name change before submitting it. If you still have trouble changing your name, don’t hesitate to contact Facebook support for assistance.
If you’re looking for more Facebook guides, tips, and tricks, be sure to visit Path of EX and bookmark it for future reference. There, you can find more helpful information and resources to enhance your Facebook experience.